Thursday, December 17, 2009

Homemade Pasta


I do love making things that seem by ordinary daily standards seem to be impossible, ergo Homemade Pasta. Besides the fact that fresh pasta tastes infinitely better it also cooks quicker too, maybe three minutes is rolling boiling water.

It is a funny thing that has happend to the home cook. It is as if restauntaurs and commercial food companies and have launched on a collective intimidation campaign. And homefood shouldn't be fancy or fussy, but warming to the heart and the belly. This recipe is adapted from a dear book called The Art of Simple food by Alice Waters. I love this book not only for the fantastic recipes, but because of the overall theme that few, very good ingredients put together makes wonderful meals and really heart-filling happy times when shared with one's family.

Ingredients

2 cups of flour
2 eggs
2 egg yolks
1/4 cup of cornmeal for dredging after it is cut

Method

1. I put all the ingredients in my standing mixer and let it whiz about until all is combined into a golden disk of delicious dough.

2. Wrap in cling and store on the counter top until ready to use or at least 30 minutes so the dough is relaxed. It dough is like people in that respect... it needs time relax too.

3. Cut the dough into quarters and working one quarter at a time slowly work through your pasta machine. Starting on the largest setting roll through until desired consistency of pasta sheets. If you are going to use for ravioli or lasagna... you are done.

4. Once all the pasta sheets are rolled out, assemble your pasta cutter and roll your pasta through the cutter.

5. Dredge in cornmeal or excess flour to prevent sticking after the pasta is cut.

You can cook straight away in a allow the pasta to dry on a rack , or store in the fridge for two days or the deep freeze for two weeks. Once frozen don't bother to defrost simply put in the pot of boiling water straight from freezer.

Once cooked you can serve it with nearly anything. But I love it simple and delicious with shaved parmesan and good olive oil.

Mangia!
As always, many blessings, much love, and happy eating!


Wednesday, December 16, 2009

Spiced Apricots and Pears


When I was a young girl, I always looked forward to my Aunty M's overflowing sparkling holiday dessert table. I mean this literally was the thing of little girls' dreams, the pies, the cakes, the treats. I know from the mind of an adult, that it didn't sparkle. But somehow, I seem to remember that it did have a sort of magical glisten. And with out fail, as if you could set a clock by it, there was always her hot mixed fruit salad. More of a pie filling in syrupy treacle and then anything that could ever be inferred by the word salad. Nonetheless, this is my homage to that delicious sweetness of my childhood and the delicious sweetness that my Aunty M still adds to my life today. Now, I like to package these up in pretty jars with ribbon to share with others. Oh it is delicious on nearly everything, I like it with vanilla ice cream or cold ham leftovers.
Ingredients

1 large can of apricots in syrup (if it is in juice add 1/2 cup of icing sugar)
1 large can of pears in syrup
1 tablespoon rice vinegar or any white vinegar you have
2 sticks cinnamon
1/2 teaspoon of powdered ginger
1/2 teaspoon crushed dried chili flakes
1/8 teaspoon of cardamon
1/8 teaspoon of all spice berries
3 whole cloves
3 cardamon pods
1/4 teaspoon of peppercorns
1/2 teaspoon flaky sea salt


Method

Pour your entire ingredient list in to a heavy bottomed saucepan and allow to come up to a boil. Once there, let the spicy exlir happily bubble away for a minute or so. Cool and spoon into jars this golden treasure for unsuspecting but very lucky recipients... including yourself.
Cook's Notes...

You certainly could simplify this for yourself by using a pie spice mix or some mulling spice. Simply stir in 2 tablespoons of the mulling mix or 1 tablespoon of the pie spice mix, and omit the rest of the spices save the peppercorns, salt, and chili flake.

I know preserves can be a tad intimidating. My friend Meg and I once embarked on three day exposition into the depths of Strawberry Jam Purgatory, of which I am not sure she has recovered. Nonetheless, we emerged with delicious jam that I enjoy today. But the reason you preseve with cavity-inducing amounts of sugar and sterlized glasses is so that it can stay on the shelf for years and years. I don't want this to last until the next ice-age, just in the ice box. So, you needn't mess about with the sterilization of jars. Just put them in the heated wash of dishwasher, store in the fridge, and use the contents straight away. I don't think I have ever had any go bad...

As always, much love, many blessings, and happy giving!

Chocolate Dipped Pretzels

Everybody loves chocolate covered pretzels. The salty, sweet, chocolate combination is completely addictive. I mean really, what more could you possibly want. I like to keep these in my office for passerbys, vagabonds, and occasional vice presidents. Around the holidays I like to think of them as festive pool cues.
This is not so much a recipe as it is an emacipation proclimation from over-priced store bought chocolate pretzels. I am not sure what sort of evil confectionary marketing scheme was effective in convincing us all that we were not capable of melting chocolate and dipping things in it. But apparently, it has worked. Let us be liberated and enjoy the simple and delightful task of dipping all things in chocolate... but especially around christmas.

Ingredients
Pretzels Rods
Chocolate Chips any kind
Toppings (sprinkles, nuts, other types of melted chocolate)

Method

1. Nuke a cup or so chocolate chips in a microwave safe bowl on high for 30 seconds.
2. Stir and nuke again for 30 seconds.
3. Stir until all of the chocolate buttons are melted
4. Dip the pretzles in the melted chocolate and use a spoon or spatula to smooth.
5. Twirl off excess chocolate and allow to slumber leisurely on a blanket of wax paper covering a cookie sheet.
6. Sprinkle with child like abandon your favorite toppings. Here I used my favorite nuts pecans and some darling Christmassy sprinkles.
7. Plop the whole cookie sheet, wax paper, choco-pretzes in the ice box. Allow to cool until hard about 15 mins.
Emjoy! I like to display them in vases as if they were flowers. But they are delicious and fast moving no matter how you put them out.
As always, much love, many blessings, and happy choco dipping.


Wednesday, December 9, 2009

Cranberry Almond Bars

In the spirit of the holidays here is a lovely simple delicious recipe to whip up something to share. I really love Christmas. It is one of those times when being overly generous and indulgent of ones friends and family is not only tolerated it is encouraged. I love food, and I love to give food as presents. The red christmassy cranberries coupled with the rich nutty almonds makes this a wonderful treat. I over-indulge myself by adding a sugary snow of frosting with delicious orange tang of Grand Marnier. These bars texture is light and a bit more like a pound cake, all the same, perfect for a Christmas breakfast accoutrement or an addition to host gift basket.

Ingredients
3/4 cup unsalted butter, plus more for pan
1 & 1/2 c. sugar
2 eggs
1 tsp pure almond extract
1 & 1/2 c. unbleached, all-purpose flour
1/8 tsp coarse salt
2 c. fresh cranberries
1/3 c. slivered almonds

Method
1. Crank your oven to 350. Lay parchment in an 8X8 pan and spray with PAM to prevent sticking.

2. Melt the butter in the microwave and let it sit for a moment.
3. Whip the sugar and eggs together for a while. Add the melted butter, and extract. Stop the mixer, and add in the flour and salt. Mix until combined.

4. Stir in the cranberries and almonds using a spatula.

5. Pour into the prepared pan and bake off for 22 minutes or until a toothpick comes out clean...

Hazaaa, homemade cranberry almond bars. Let them cool on a wire rack.

In the mean time you can whip together 1/2 cup of confectioners sugar and 1 teaspoon of Grand Marnier to make the drizzle frosting. Apply liberally... it is the holidays.

Enjoy! As always, much love, many blessings, and happy baking!

Friday, July 24, 2009

Dark Chocolate Cupcakes with Easy Cheater's Cream Cheese Frosting


Chocolate Cupcakes! Yeah, yeah, yeah. At my office we have had a killer work week. What could be more rewarding for surviving to Friday, then Chocolate Cupcakes with Cream cheese cheater frosting? From a bakers perspective cupcakes are a wonderful treat, because they basically a muffin recipe and they bake in 20 minutes. You can’t beat it. And, as ridiculous as it sounds, it is really fun to do by hand, you need three bowls and a whisk, but it is super easy and delicious. I love the silky shiny chocolate as it comes together with the butter. I love how the swirl of sour cream submits to the sublime darkness of the chocolate. It is such a pleasure to take something simple and make it by hand with good quality ingredients. The results delicious and the satisfaction is unjustifiable enjoyable as well.

1 stick of buttah, cut up to melt more easily
2 oz or two of those squares of dark chocolate
½ cup of cocoa
¾ cup of all purpose flour
½ teaspoon of baking soda
¾ teaspoon of baking powder
2 large eggs
¾ cup of sugar
1 teaspoon of good quality real vanilla extract
½ teaspoon of table salt
½ cup of sour cream (I just love sour cream in cakes)

Preheat your oven to 375 F
Over a double boiler melt the chocolate and butter, stir in the cocoa. You don’t really need a double boiler just a pan with water and bowl that fits over top. Whisk until smooth and let it cool to body temperature while you prepare the other ingredients.
In a separate bowl whisk (bowl #2) in the next 3 ingredients, flour, baking soda, baking powder.
In a third bowl (bowl numero tres) whisk together the eggs, sugar, vanilla, salt
Into the large chocolate bowl, add wet egg bowl and the dry flour bowl. Last but not least stir in sour cream.
Spoon into muffin tin with cupey cake holders and let bake for 20 minutes.

Dark Chocolate Delicioso. I added cheater's cream cheese frosting which is a stick of butter, a package of cream cheese, and 2 cups of powdered sugar whipped together. It is delicious and sooooo easy. The easy part is why I call it cheater's frosting.

Please enjoy.

Happy baking, much love, and many blessings.

Friday, June 26, 2009

Espresso Valhrona Cupcakes


I love coffee with desert. There is something about it, the complex bitterness of the coffee met with sweetness and texture of a dessert. I hate sweet coffee, but I love the combination. Chocolate Espresso Cake is me dressing up an old classic with delicious instant espresso and indulgent Valhrona chocolate.

Cupcake Batter

2 cups all-purpose flour
1 cup unsweetened cocoa powder (I have cocoa from the Dominican Republic)
2 Tablespoons of Instant Espresso
1-1/2 teaspoons baking soda
1 teaspoon ground cinnamon
1/2 teaspoon salt
1/4 teaspoon baking powder
2-1/3 cups granulated sugar

3/4 cup vegetable oil
3 eggs
1 teaspoon vanilla
1/4 cup cream
1 cup strong brewed coffee, cooled to room temperature
6 ounces dark chocolate, finely chopped, best quality

Chocolate Glaze

6 ounces dark chocolate, finely chopped, best quality
1/2 cup whipping (35%) cream
1 Tablespoon of Instant Espresso Powder

Crank your oven 350 F

In a small bowl, whisk together all the dry ingredients: flour, cocoa powder, Espresso powder, baking soda, cinnamon, salt and baking powder. Whisking is a wonderful way to quickly air ate and essentially sift the dry ingredients.

In a larger bowl, whisk together the sugar and oil. Add eggs, one at a time, beating well after each addition. Then the vanilla, milk, and coffee.

Add the dry ingredients over the wet and whisk until just combined with minimal lumpage. (Yes, that is a technical term).

Heat the cream and add the chocolate off the flame. The hot cream will melt the chocolate. Swirl into the batter, no need to over mix, the swirl provides a lovely texture contrast.

Spoon batter into muffin tin with liners.

Bake for about 20 minutes or until a toothpick comes out clean. Allow to cool on a rack.

Chocolate Glaze

Microwave the chocolate and cream at 10 second increments, stirring between each heating period to make sure you don't burn the chocolate. WARNING... CHOCOLATE BURNS EASILY... Danger Will Robinson, Danger! Once it is melted, add instant espresso, and spoon chocolate ooze over cooled cupcakes.
Put them in the Chill Box for 20 minutes or so that they can harden for travel. Or if serving right away serve warm with chocolate oozing on to a plate with a dollop of Vanilla Gelato.
Enjoy with friends, family, loved ones, co-workers, strangers, or anyone who is not allergic to the ingredients, because anaphylactic shock is no fun.
As always, much love, many blessings, and happy baking.


Wednesday, June 10, 2009

Teaism's Ginger Scones


My good friend Meg and I made much, much, much, Strawberry Jam this week. How can you not, being it June in Virginia and so many beautiful Farms to pick strawberries at. But being excited to try our newly preserved strawberry goodness, I was pondering something delicious to bake to enjoy with.... Eureka Ginger Scones... perfect spice balance to the bright red sweet strawberry ooze.

For those of you not familiar with Teaism, it is a small Japanese Inspired Bistro which in my opinon makes the most delicous intensly flavored Ginger Scones. I have modified their recipe to make it more home-cook friendly.

1 cup all-purpose flour
1 cup pastry flour (whole wheat)
3 tablespoon granulated sugar

1/2 teaspoon ginger (powdered)
1/2 teaspoon salt
1/2 teaspoon baking soda
1 teaspoon cream of tartar

5 tablespoons unsalted butter, cut in pea size cubes
2 ounces chopped, sugar crystallized ginger
3/4 cup cream

1 egg yolk, beaten with 1 teaspoon cold water to make an egg wash

Crank your oven to 450 degrees F.

You can do this by hand with a pastry cutter or your mixer. I like to do by hand so that I feel unjustifiably talented. It is more than easy...

Mix together all of the dry ingredients in a bowl and add the cubes of butter. Turn your mixer on or use a pastry cutter to make those dangon butter flour packages that pea sized globules. Stir in the ginger bits and the milk.

Flour your work surface and push out the ginger scone dough. It is all going to try and crumble and fall apart, but don't give up, keep pushing it together, like family it takes a while to unify. Pat it and shape it to make a large rectangle about 1/2-inch thick. Cut into about 12 triangles with a bench scraper or a knife or what ever kitchen accoutrament pleases you. Place on ungreased parchment paper on a cookie sheet. Generously shmear the tops of the little ginger mounds of delicousness with the egg wash and sprinkle with turbinado (raw) sugar.

Bake for about 10-12 minutes until golden.

Enjoy with your choice of topping and favorite tea. Or share with the woman who picked 2 more pounds of strawberries than you.

As always, much love, many blessings, and happy baking. :)

Mark's Maple Bacon Muffins


When my brother Mark was barely older than toddler, he used to take the maple syrup bottle and flood his entire breakfast plate. You name it: eggs, bacon, sausage, pancakes, corned beef hash, if it was on the plate or for that matter on the table it was doused in golden treacle. These muffins are homage to the kid in all of us that likes to mix different things on our plate and try them.

I know bacon and maple syrup in a muffin sounds less than appetizing… but just give it a try. Think of it as a portable breakfast buffet made fun size in an ity-bity muffin.

8 bacon strips, cooked and crumbled (save the drippings)

2 cups all-purpose flour
3 teaspoons baking powder
1/4 teaspoon salt

1 extra large egg
1/2 cup buttermilk
1/2 cup bacon drippings
2/3 cup maple syrup

Drag out the ol’ cast iron and fry yourself up some bacon, line a rack with paper towels so the bacon is crispy, and save the drippings. (You can do this in the microwave or the oven, but why, when the whole house can be perfumed with the delicious unctious smell of bacon.)

In a large bowl, mix together all the dry ingredients: combine the flour, baking powder and salt.

In another bowl, whisk the egg, milk, oil and syrup.

Pour the wet into the dry and mix. Fold in the crumbled crispy bacon pieces of goodness.
Fill-up a greased muffin tin and bake at 400° for 20 minutes or so. Check with a toothpick and when it clean let rest on rack. Bring to office and let colleagues devour… If you have any leftovers refrigerate, but there won’t be any.

As always, much love, many blessings, and happy baking

Friday, April 24, 2009

Welcome Back Cinnamon Rolls


Nothing says we missed you like warm coffee and freshly baked cinnamon rolls. So move over Mr. Pillsbury, you ain’t got nothing on homemade cinnamon rolls. Although you are super cute and I do love it when they push your belly and you laugh…
Like most yeast breads, there is rise time involved, but you can break it into steps and let it rise over night so all you need to do is pop it in the oven for 20 minutes in the morning. This recipe is adapted from Chef Leslie Meyers, Instructor at L’academie de Cuisine.

Dough

½ cup of warm water
1 Tablespoon of yeast
¼ cup of sugar
½ cup of milk
1 stick of buttah
1 egg
2 egg yolks
1 ½ teaspoons of salt
4 cups of all purpose flour

In a measuring cup combine the warm water, the yeast, and the sugar. Let stand until poofy. I call this step poofing, but really it is called proofing. The bubbles are proof the yeast is active. That way all you waste is sugar and water not the whole dough.

In a sauce pan warm up the milk and buttah until it is melted and then let the mixture cool.

In your mixer, add the eggs, the egg yolks, the yeast mixture, and the cooled milk/butter combo to combine. Add the salt and flour. When the dough pulls away from the bowl switch to the dough hook to knead for a couple minutes until the dough is smooth and glossy. If the dough is still sticky and not forming a ball, add ¼ cup more flour. The dough will be a smooth shiny yellow tan color.

When smooth and elastic, place in a bowl sprayed with Pam and turn the dough in the bowl so it to is properly lubbed up. Cover with plastic wrap and let rise until doubled. This means you can either leave it in the fridge over night or you can let proof in a warm place for 2 hours.

Filling

1 cup firmly packed brown sugar
¼ cup of cinnamon
1 cup chopped pecan (if you wish)
1 stick of butter soft or melted

Mix the sugar and cinnamon in a bowl and set aside.

Punch down the doubled dough, and lightly dust your rolling pin and work area. Turn the dough out and roll 15 inch by 20 inch rectangle (sort of). 15 inches is about the length of woman’s forearm, 20 inches includes the hand. But just eyeball it. You want the dough to be about ¼ an inch thick.

Spread the butter out all over the dough.

Put on the cinnamon and sugar. Press into the dough so it sticks. Sprinkle nuts if you wish, and press those in as well.

Now, start to roll up the dough and filling with the long side closest to you, so you can make a long roll.
Just lift the dough, form a little lip and lift and roll until the end. Pinch the ends of the roll closed and push the seam together and roll seam down.

Using a serrated knife, gently saw the roll into 12 equal slices. Try to keep the round shape.

Butter a 13 X 9 pan, glass or metal doesn’t really matter. If the dish is dark glass or non-stick metal and dark, baking time will take a little longer.

Add any of the left over sugar mixture to the bottom of the pan. Place the rolls evenly in the dish. They won’t touch now, but after the second rise they will just kiss but be easy to pull apart.

Place the rolls on to the baking sheet, cover with plastic wrap and allow doubling in size. This means an hour in a warm spot another night in the re-fridge.

Once doubled, bake at 350 for about 20 minutes, or until a toothpick comes out clean.


Cream Cheese Icing

¼ stick of butter (soften by leaving out overnight)
6 oz of cream cheese (softened in the microwave, because I forgot to take it out)
1 cup of powdered sugar
1 teaspoon of vanilla extract

In your standing mixer with the paddle attachment. Whip all the ingredients for as long as you wish. Just start slow or you and your kitchen will be covered in a cloud puff of powdered sugar. Unless you want reminisce about when you used to get into your grandmothers makeup drawer and spilled all of her dusting powder and then you were four smelled like Channel #5 for a week.

Set aside at room temperature.

When the cinnamon rolls are baked, let cool for 10 minutes before spreading the icing.

Makes 12 to 14 rolls.

I know it sounds like a lot of work, but when you break it into steps it really is about 20 minutes at a time. And the reward is the best cinnamon rolls you have had even better than ones at the mall and a much more manageable size to boot.

As always, much love, many blessings, and happy baking.

Friday, April 17, 2009

I declare… Éclairs!


Last night I recieved the most generous gift; I was given a copper pot set! I can scarcely believe it, somebody pinch me. I love, love, love the set. Thank you Blythe and Carl, for your wonderful friendship; which is most certainly gift enough. You will always have open chairs at our dinner table.


But, what to do with copper pots for a baking blog? The answer: a marvelous concoction of pate a choux, pastry cream, and chocolate ganache; each mind you requiring its own divine copper pot.

The Éclairs, albeit tasty and delicious, were really just a pleasant side effect of using my lovely copper pots. This recipe is adapted from my L’academie de Cuisine instructor, Chef Leslie Meyers.

Pate a choux

1 cup of water
1 stick of unsalted butter
1 Tablespoon of sugar
¼ teaspoon of salt
1 cup of flour
1 teaspoon of baking powder
3 to 4 extra large eggs

Preheat your oven 425 F and line two cookie sheets with parchment paper.

In heavy bottomed pot over medium heat add the water, butter, salt, and sugar and allow the mixture to come to a simmer. Once the butter has melted all at once add the flour and baking powder. Now, get your whisking arm ready, because you will whisk the mixture until it is smooth. Once the dough has begun to thicken, stir with a wooden spoon and continue to stir/cook until a thick film of cooked starch has covered the bottom of the pot. It looks like a clear film that will be difficult to clean, and it is, just soak it. Once completely cooked and film developed, maybe 3 minutes.

Transfer to your standing mixer or food prep. Turn it on high, to let some of the heat out. When the mixture has cooled a little, add the eggs, one at a time. The dough should be glossy and sticky, if it is still flat not combined add another egg or part of it. When the dough is shiny and sticky, place it in a pastry bag with a large tip.

On the parchment paper, pipe thick lines of dough to create the choux éclairs bodies.

Bake at 425 F for 10 to 15 minutes until the dough is puffed and blond brown.

Turn the oven down to 375 and bake for another 10 minutes until the choux are tough.

Turn the oven off, and let the choux cool in the oven. Opening the door, not only reduces the heat but also the humidity as well. Poke each choux with a toothpick to facilitate drying.

Pastry Cream

2 cups or an entire pint of half and half
¼ cup of sugar
5 egg yolks
¼ cup of sugar
¼ cup of cornstarch
Seeds of 1 bean pod of vanilla

In a heavy bodied pan over medium to low heat, simmer the half and half and the first sugar portion. Do not allow the mixture to boil.


Separate the eggs and add the second portion of sugar and the cornstarch in your standing mixture and whip until pale yellow. While the standing mixture is running, slowly, very slowly, stream in the warm milk mixture. When the eggs and milk is completely incorporated, transfer back to your pan and return to low heat.


Over the heat, stir for 7 minutes until the mixture begins to thicken and you can no longer taste the cornstarch. When thick, return to bowl to cool, cover with plastic wrap and allow to set in the refrigerator.

Transfer cooled cream to pastry bag with star tip to fill.

Chocolate Ganache


2 cups of dark chocolate, chopped
1 cup of heavy cream, warmed

Over a double boiler or in the microwave heat the heavy cream until it warm to the touch, but not boiling. Add the heavy cream to the chocolate; allow the heat from the heavy cream to melt the chocolate. Stir until smooth and shiny.

To assemble

Use a toothpick to create a small hole to fit the pastry cream tip into, and fill squeezing the cream until the choux is just filled. Line all of the filled choux on cooling rack with parchment paper underneath to catch the drips. Glaze, spoon, or pipe chocolate ganache over the tops of the filled chouxes. Viola you now have éclairs. Place in the fridge to allow the ganache to harden.


Serve to your happy office folk, who now on Fridays, wait in the lobby, until I bring breakfast.

Cheers, to great friends, wonderful reasons to celebrate, and excuses to eat together.

To all of you, much love, many blessings, happy baking, and may you all be blessed with caring friends who love to celebrate.

Friday, April 3, 2009

Baby Banana Muffins


When life hands you over ripe bananas make baby banana muffins. This recipe is very simple and in the mini muffin pan it takes less than 15 minutes to bake… Baby Banana Muffies… mmmm. So what do you think, baby + muffins = buffies? Or does that sound like the plural version of one 1990’s blond vampire slayer…

Banana Muffin Batter (you can choose any baking vessel you like big or small, I don't judge)

1 egg
1 teaspoon of vanilla extract
2 Tablespoons of oil
2 Tablespoons of honey
2 super ripe brown ucky banana
1 cup of flour
½ teaspoon of baking soda
1 teaspoon of baking powder
1 teaspoon of cinnamon

Preheat your oven to 375 degrees F.

In your favorite handy dandy mixer: throw in all the ingredients starting with wet and then mix in all the dry. The batter will be brown lumpy and ugly. But like the ugly duckling, this yummy batter will bake into lovely swan of a breakfast treat. No worries (these muffins are completely vegeterian and no ducklings or swans were hurt in the making of this blog post.)

As always, many blessings, much love, and happy baking.

Wednesday, March 25, 2009

Shrimp, Fire Roasted Corn, and Bacon Pizza


I know what you are thinking… “What is she smoking?” But I promise this flavor combination is fantastic. The sweet fire roasted corn balances the salty smoky flavor of the bacon. The sweet plump shrimp texture is remarkable in contrast to the crunchy bacon and the soft crunch. The creamy béchamel sauce ties all of the pizza together beautifully. So give it a try… or experiment with your own pizza flavor combo.

Pizza Dough (makes double what you need, store the other half in the fridge for 3 days or the freezer for two weeks):

1 package of quick-rise yeast
1 cup of warm water
1 teaspoon of sugar
2 ½ cups of flour
1 teaspoon of salt

Preheat your oven to 425 degrees F.

Proof the yeast in the warm water and sugar to make sure it bubbles. This will take about 5 minutes. When you are sure it is good, add in the salt and flour. Combine with your hands until dough is formed or if you are doing this in your standing mixer use your hook attachment and mix until the dough pulls away from the side of the bowl. Let it sit for about 20 minutes. Or however long it takes you to take out the rest of your ingredients and cook your bacon. When you are ready, cut the dough in half. Keep half in the fridge for another pizza or bread sticks. Roll out your pizza on to 12 inch pizza pan and bake at 425 for about 10 minutes or until the dough turns a light brown.

Topping:

3 strips of bacon (I used turkey smoked bacon)

1 cup of cooked shrimp

1 cup of fire roasted corn


Cook your bacon on the stove top in a skillet. Either use frozen cooked shrimp and thaw before use or if using fresh uncooked boils for three minutes and then drain. I used frozen fire-roasted corn, which I thawed before use. But I bet in the summer freshly grilled corn will be phenomenal…
Toss all of your prepared ingredients together and let sit in sieve in the sink to drain out any excess liquid. Runny pizza is not a happy pizza.

Sauce:

This is a simple béchamel, but you would be amazed how few people know how to make this amazing delicious and easy white sauce.

1 Tablespoon of Buttah
1 Tablespoon of Flout
1 cup of Milk (any kind)
Salt and pepper to taste.

In sauce pan on medium heat melt the butter. Add the flour and whisk together until you have a gorgeous sunny golden paste. The flour needs to cook a little but not get burned. The more you cook it the less ability it has to thicken the sauce, so no more than 3 minutes. When completely integrated add the cup of milk and whisk. Stir until there are no lumps. Within 5 minutes you will have a velvety delicious sauce, add freshly ground salt and pepper to taste.

To assemble the pizza:

Take out your prebaked crust. Add the creamy sauce. Poor on your toppings. Bake at 400 for about 15 minutes, maybe less depending on your oven and pan.

Then enjoy… It was so good, I had left over for breakfast.

As always, much love, many blessings, and happy baking.

Friday, February 27, 2009

Cardamom Carrot Cupcakes filled with Creme Cheese Frosting


Spring is coming. In celebration of this wonderful season knocking on our front door, cardamom carrot cupcakes with a smooth crème cheese frosting. I love anything that mixes my favorite two ingredients exotic spices and fresh produce.

In Northern Africa and India in the souks they have these incredible outdoor spice markets. Oil drum sized burlap sacks filled with whole spices in pools of orange grains, golden shavings, red kernels. The street is perfumed with the aromatic incitements of 7 continents. Like sirens calling you, the scent entices you to hand over your last Yankee dollar for what the boisterous peddler bellows. We don’t have that in the US, unfortunately we don’t the same love affairs with spices either. I like to think it is due to our rugged nature and our modern refrigeration. Nonetheless, when it comes to spices, always buy fresh in small quantities and grind your own. For this recipe I used, cardamom, ginger (technically not a spice, but whatever), pepper, cinnamon (canella), clove, sea salt and nutmeg. The result is a cupcake with layered flavors but not an overpowering spice taste. It’s a cupcake for goodness sake not vindaloo curry.

To make this cupcake special, I played around with spice blends and used more exotic Indian ones, but cardamom is easy to find in any supermarket. I also fill the cupcake and ice the top with a simple but delicious cream cheese frosting; I call it crème cheese frosting because I add crème friache to give it a whippy tang.


Cardamom Carrot Cup Cake

2 ½ cups of flour
1 ½ teaspoons baking powder
2 teaspoons baking soda
2 teaspoons cardamom
1 teaspoon freshly ground ginger
¼ teaspoon pepper
2 teaspoons cinnamon (canella)
¼ teaspoon clove
1 teaspoon sea salt
½ teaspoon nutmeg

1 ½ cup of sugar
½ cup brown sugar
1 ¼ cup of oil
4 large eggs
1 teaspoon of vanilla
3 ½ cups of shredded carrots (go ahead use the food processor save your hands)

To make the cupey cakes:

Heat your oven to 350 F. Get a cheapo thermometer and test your oven, very rarely are they calibrated properly. For my little oven, 375 markings on my oven dial really means 350 F in reality.

Using a coffee grinder add your spices and create your spice blend. For cinnamon I blitz it in the food processor then the coffee grinder. You would be amazed the difference and it’s a little vacation for your nose.

Add your spice blend to the rest of your dry ingredients and set aside. Remember sugar is not a dry ingredient because it melts when heated.

In your favorite standing mixer let the oil and sugars get well mingled and add one egg at a time. Add the vanilla and carrots. While your wet ingredients are getting acquainted, set up your muffin tins.

In your muffin tins, add cup cake liners and Pam everything up. I mean everything, the tins, the liners, the top of the tins, your children if they are around. You don’t want the cupcakes to stick to anything.

Add the dry ingredients to your wet ones in the standing mixer. And let the mixer go until just incorporated. I took an amazing cake baking class last weekend. The instructor Amy Riolo http://www.amyriolo.com/ said: “when it comes to cakes under mix, when it comes to frosting over mix.” Awesome class, awesome lady.

When just combined spoon into your prepared cupcake liners.

Bake for 26 minutes or until a toothpick comes out clean. It is soft and airy batter, so don’t worry if they pop up.

Let cool on a rack.

Now comes the fun part icing and filling.

Crème cheese frosting
1 8oz package of cream cheese softened
1 stick of butter softened
1 lb roughly 2 cups of powdered sugar
2 Tablespoons of crème friache

Add all of your ingredients to standing mixer and let her whip, and whip, and whip. Until you have a light airy delicious frosting.


To ice and fill.

I fill a disposable pastry bag (I got 50 at Wal-Mart for $3) fitted with star tip and fill the bag with the icing.

Push the tip into the cupcake top and squeeze until you feel slight resistance. Your cup cake is filled.

Ice the top as you desire. I liked the little star shape the filling the cup cake makes so I continued to make the little star shape all over the cup cake.

Enjoy. Go forth use spices, make cupcakes, and express yourself.

As always, much love, many blessings, and happy baking.

Thursday, February 26, 2009

Mini Chicken Pot Pies


I love chicken pot pies, they are like little chicken hot tubs of creamy goodness. I especially love them with big chunks of chicken and when the veggies are still crisp.

With cold months waning, it seems only appropriate to lick the last spoonfulls of comfort food in anticipation for fresh farmers markets springing up. I’ve made a cheaters chicken pot pie to enjoy on a cold evening. When baked the creamy filling oozes out the sides of the golden crusty mini pies. The taste fills your mouth with the luxury of creamy comfort, crisp veggies, and flaky crust. What could be better?

Why is it a cheater’s pie? Well, I used: boneless skinless chicken tenderloins; frozen cut carrots, corn, peas, and green beans; and "bakers gasp" store bought pie crust. What can I say… I’m bad, I cheated… I admit. But you can be bad too, if you wanna. Or you can roll out your own crust. If I had a large food processor, I would. Excuses, excuse… back to the recipe!

Creamy Sauce:
2 Tablespoons of buttah
2 Tablespoons of flour
1 cup of milk
A pinch of freshly grated nutmeg
Salt and pepper to taste

Filling:
2 Tablespoons of Olive Oil
1 chopped yellow onion, medium size
2 chopped stalks of celery, medium size
2 cups of frozen vegetable medley, any kind, I used an organic variety
1 lb of boneless skinless chicken tenderloins, again I used an organic variety
2 Tablespoons of dry white wine or vermouth
1 pot of creamy sauce

Pie Crust:
2 Rolled Premade Pie Crust (Bless you Pillsbury)
A few shakes of flour to keep the crust from sticking
1 whisked egg for brushing on the crust
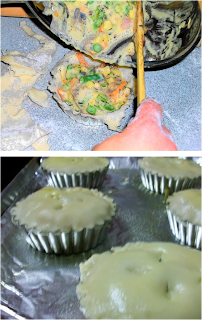
1. Prepare your mini tins with Pam and set on a foil covered baking sheet. This recipe made six mini pies.

2. Make your filling

a. Vegetables first: heat a large skillet with 1 Tablespoon of olive oil and sweat the chopped onions and celery until slightly translucent but still crispy, the vegetables will continue to cook in the pie. When cooked but still crunchy add the frozen vegetable medley and take off the heat. Remove from the skillet and place in a large bowl set aside.

b. Chicken next: in the same large skillet, don’t bother cleaning it. Add the other Tablespoon of olive oil and dice up your chicken. Add salt and pepper to taste. Cook until chicken pieces are cooked through. Add the chicken to your veggie bowl.

c. (Don’t clean the pan!) Wine sauce bit. Take your “dirty” delicious skillet and set over medium heat. Add the wine or fortified wine and with a wooden spoon stir the wine until it has taken up all the yummies off the bottom of the skillet. It will only take a minute don’t let the wine evaporate. This is good for two reasons, you don’t loose any delicious flavor, and two it makes cleanup much easier. Add the sauce to the veggies and chicken.

d. Creamy Sauce Bit: melt the butter in a sauce pan over medium heat. Add the flour before the butter is completely melted. With a wire whisk cook the flour and butter until they are a light brown almost caramel color. You don’t want it to burn but you do want to cook some of the raw flour taste out. The longer you cook this mixture the less chance you have at the sauce thickening up complete. Add your milk and continue to mix until the butter/flour paste is fully incorporated. Add your spices over the heat and continue to mix until you have a thick and creamy sauce. It only takes a few minutes. Add your creamy sauce to the veggies, chicken, and wine.

e. Fix all of the ingredients and taste. Add seasoning as required. Allow your filling to cool while you assemble your pie crusts.

3. Pre-heat your oven to 400 degrees F

4. Assemble your mini pies

a. Cut your pie crust to fit your molds. Remember to save enough dough to make the tops.

b. Fill the bottom of your molds or mini pie plates with the crust.
c. Brush with the egg wash. You can use a pastry brush, or like me, I use whatever I have close at hand including my fingers. This time I used a new paint brush.

d. Fill the pies just to the top with your delicious creamy filling. I admit I usually overfill. But in truth, I’m guilty of overfilling just about everything from pies to laundry baskets to friend’s stomachs.

e. Take your pie tops and pinch the tops and bottoms of the pastry together.

f. Brush the tops with your egg wash

g. Take a sharp knife and make steam vents in the top crust

5. Bake your mini pot pies in pre-heated oven for 25 to 30 minutes until the pies are golden brown and the gooey delicious filling is bubbling outside just a little.

6. Let cool on a wire rack.


I hope you get to use this recipe and make someone stomach and heart warm.

As always, much love, many blessings, and happy baking.

Friday, February 20, 2009

Apple Dutch Cake


You know in your closet… how you have your favorite pair of jeans or maybe it’s a black sweater. You wear it all the time, dress it up, dress it down, it’s super comfortable so you wear it even when no one is around. I have a cake recipe for you… the preverbal favorite pair of jeans for your recipe armoire. You can dress it up, dress it down, add any fruit you like, ice it, dust it, or leave it plain. It’s delicious no matter how you slice it or accessorize for that matter.

Today I choose to dress it down, putting the fruit on top making a sort of rustic Danish, and then lightly icing it to make it appetizing.

The cake is simple enough
1 ½ cup of flour
½ cup of sugar
½ teaspoon of salt
2 teaspoons of baking powder
1 egg
½ cup of milk
1 teaspoon (or cap full) of pure vanilla extract
1 stick or ½ cup of butter melted … sorry, I mean buttah… shout out to my brother.

Preheat your oven to 400 F. Pam up your baking vesicle of choice.

Mix all the dry in the standing mixer. Mix all the wet in another bowl, I used the measuring cup I melted the buttah in. Turn on the mixer to start the party, with the dry ingredients. While the dry ingredients mingle, add the drinks. (Then add the wet into the dry.) It will take less than a minute for the two to combine, much like a regular party. When the two are happy together, pour into your buttered pan.

Voila… (Do you know that the French and the French Canadians actually say that a lot? It is surprisingly not a stereotype, they really do it.)

It needs about 25 minutes tanning… baking, and your done.

I dressed mine up with apple Dutch topping:

1 uber larger granny smith apple, peeled and sliced
½ cup of sugar
1 teaspoon of freshly ground cinnamon
2 tablespoons of golden raisins

Place the apple slices into the batter making a decorative pattern. Mix together the sugar, cinnamon and raisins in a bowl. Sprinkle over top… ready? Voila. Bake at 400 F for about 35 minutes or until a toothpick comes out clean.

For this rendition, I choose to accessorize with classic icing glaze. But really you could do anything with this recipe, any fruit, any topping. Chocolate chips, pineapple upside down or right-side up cake, cranberry upside down cake… whatever your heart’s desire, or whatever you have in your fridge. My only caution is that you taste the topping on its own. It should taste good raw, you don’t want it to be too tart. My rule with baking is, if doesn’t taste good raw, it won’t taste good baked. That is not the same with ground beef, please don’t try raw ground beef.

Hope you come up with many wonderful expressions of your personal style with this cake.

As always, much love, many blessings, and happy baking.


Wednesday, February 11, 2009

Almond and Apricot Whole Wheat Bread


Quick bread, a marvelous cooking innovation that just perfect for the instant-gratification, buy-now pay-later, Seven11 at 2 in the morning kind of society we have become. Think about it: homemade bread, in under an hour. We have the delicate aroma of homemade bread wafting from the oven as dinner is being made while still being able to work over time for that project that just popped up at 4pm.

Here, is a wonderful recipe for whole wheat high-fiber bread that can be made in under an hour. The scent of the orange extract just perfumes the house with a heavenly scent of fresh baked bread. It is worth making the bread for the smell alone. Have less time… no problem, all quick breads make marvelous muffins by increasing the temperature to 375 F and reducing the baking time to 22 minutes give or take.

1 1/2 cups of hot water
1 1/2 cups dried apricots -- blitzed in a food processor
2 tablespoons buttah
1/2 cup maple syrup (i used sugar free... weight watchers... ewww)
1 egg
1 teaspoon orange extract
1 1/2 cups unbleached flour
1 cup flour, whole wheat
1 teaspoon salt
1 teaspoon baking soda
1/2 teaspoon baking powder
1 cup sliced almonds, chopped/sliced/whatever

1. Preheat your oven to 350 degrees F.
2. Take your measuring pitcher and heat up the water in your microwave or from your kettle rehydrate the dried apricots. Once soft, add the water and the apricots to the standing mixer.
3. Add all of your ingredients to mixer in the order they are listed and let mix until dough seems sticky and well incorporated.
4. Grease your loaf pan or baking receptacle of choice.
5. Bake for 45 to 50 minutes or until a dark crust has appeared, and a toothpick comes out clean.

Enjoy a thick slice with dinner and some nice buttah…

As always, much love, many blessings, and happy baking.

Friday, January 30, 2009

Honey Bread Minis


Did you know the Honey Bee species is endangered? http://www.pbs.org/wnet/wildtv/endangered.html. Well, to do our part, we supported the http://www.helpthehoneybees.com/ and for Christmas I requested and received wonderful raw and natural honeys. But once you have, as I have, horded all your honey, what to do with it. This sweet golden elixir uses are countless, but what to do? You can only put so much in your tea and toast with cheese. Unlike the beloved children's character Pooh I cannot stomach it off of my fingers.

For this recipe I used a German Rap Seed Honey a raw wild flower honey, which was a pale yellow creamy color with a strong floral scent but a delicate and almost tongue-tingling taste. It was a Christmas gift from my dear friend Kristine. The wild flower honey complimented the ginger in this recipe perfectly, but any wonderful version of the bees' elixir will do.
Honey Bread Minis
2 cups of flour
1 teaspoon of baking soda
1 teaspoon of baking powder
1 teaspoon of salt
1 teaspoon of ginger
1/2 teaspoon of cinnamon
1/2 cup of honey
1 cup of milk
1 egg lightly beaten

Heat your oven to 375 degrees F
Spray your muffin tin or silicone of choice. Usually I am big proponent of the old fashioned metal muffin tins, but this recipe benefits from silicone because the top and bottom of the muffins are more so evenly cooked.

Add all of the ingredients into your standing mixer and let it go low and slow for about 10 minutes, so the gluten develops and the honey has had a chance to be infused with the spices and blossom in flavor. A little trick to measuring honey, always use an oil/butter spray on your measuring cup and the honey will just slide out perfectly. I do that with anything super sticky, works great with peanut butter.
Pop it in the oven for 20 minutes and let cool.

Serve with butter, jam, or as I like a compound butter made of butter, cream cheese, blueberries and a little sugar. Lemon curd would also be divine if you were serving this with a good strong tea.
As always much love, many blessings, and happy baking.

I will leave you with my favorite Winnie the Pooh, exercise song. Very appropriate for a woman on Weight Watchers.

Up-Down From "The Many Adventures of Winnie the Pooh"
Composed by Richard M. Sherman and Robert B. Sherman

Up - Down - Up
When I up, down, touch the ground it puts me in the mood
Up, down, touch the ground in the mood for food
I am stout, round and I have found speaking poundage-wise
I improve my appetite when I exercise
Oh, yes, I'm rumbly in my tumbly

Time for something sweet I am short, fat, and proud of that and so with all my might
I up, down, up-down to my appetite's delight
While I up, down, touch the ground I think of things to chew
With a hefty, happy appetite I'm a hefty, happy Pooh
With a hefty, happy appetite he's a hefty, happy Pooh

Friday, January 23, 2009

Easy, fast, delicious blueberry muffin recipe


You can never underestimate the power of a fresh baked breakfast. When you can do it in 20 minutes or less, you should. So here goes…

Makes nine plump muffins, or 12 skinny ones.

1 cup of flour
1 Tablespoon baking powder (powder not soda)
½ teaspoon of regular ol’ salt (did you know that salary means salt money)
1 egg or 2 egg whites
¼ cup of melted butta or ½ a stick
1 cup milk (skim if you are watching it)
½ cup of sugar bowl sugar
1 cup of blueberries dusted in some flour

1. Pre-heat your oven to 375

2. Pam up your muffin tin

3. Sift together all of your dry ingredients (flour, baking powder, salt) and let it hang out until you are ready. I use a piece of parchment or roller’s mat to easily pour into your mixer bowl.

4. In your standing mixer throw in all of your wets save the blue berries. So the eggs, butter, milk, and sugar. (Sugar melts, so it is treated like a liquid.)

5. Once mixed, add all the dry ingredients at once. This is called the muffin mixing method. Don’t over mix, when it looks completely mixed and fluffy stop.

6. By hand fold in the blue berries.

7. Spoon into buttered muffin tin. I don’t use cupcake liners, because well, they aren’t cupcakes, and I love the brown soft crust that appears from a dark pan and direct contact.

Voila, delicious, light, and easy, and low cal should you choose. On the planet Weightwatchers, the low cal version with egg whites and skim milk is 2 points for a plump muffin. Keep the chubby in the muffins and not in the pants.

I will try and procure my soon to be mother in law’s Blue Berry Bread recipe next. It is quite delectable.

As always, much love, many blessings, and happy baking.

Blog Archive