Showing posts with label easy. Show all posts

Monday, February 23, 2015

Baked Spinach and Wild Mushroom Omelette


This is a quick and easy and super healthy breakfast. You can mix this in minutes and then let it bake. It is great for a crowd or you can cut it up and save it for your work week breakfasts. I use the frozen veggies from Trader Joe's. They are delicious and affordable... no cutting required :) Happy me.  

I have been trying to eat more vegetables for breakfast. I have not quite gotten there unless it is cooked with eggs and or bacon... but alas, no one is perfect. 

What you need: 

2 teaspoons of olive oil
1 32 oz bag of frozen spinach, thawed and drained
1 12oz bag of frozen wild mushroom medley, thawed 
8 eggs
Salt and pepper

What you do: 

1. Cook your veggies: Heat a large saucepan on medium high heat, heat olive oil, and add the veggies. Season with salt and pepper. Cook for about 10 minutes to concentrate the flavors and cook off most of the frozen waters... 
2. Crack and mix your eggs: In a large bowl crack and mix up your eggs, season with salt and peppa. 
3. Preheat and prepare: Preheat your oven to 350 degrees F. In a 9X13 baking dish, spray with nonstick or olive oil. 
4. Make your Omlette: place your cooked veggies, stir over your eggs. Mix in as best you can. 
5. Bake for about 30-40 minutes. Test the center is cooked and the edges pull away from the side. 
6. Serve for breakfast... or cut up and place in your super cool tupperware for a Working Mommy on the Go meal... 

As always, much love, many blessings, and go Mommies!

Thursday, July 31, 2014

Stuffed Cheesy Sausage Heirloom Tomatoes


I love stuffed vegetables. I think it is an Egyptian thing. We stuff anything, grape leaves, tomatoes, cabbage, eggplant, and everything stuffed is called "mashi." It is surprising how many traditional Egyptian dishes have Southern twins. This is one of them. I have put my own twist on it. I will also take this moment to brag about my garden of heirloom tomatoes, which adore. I found the Virginia Heirloom Tomato Seeds the Southern Exposure Seed Exchange, which may be my favorite website of all time. I digress. Back to the maters, because they won't cook and eat themselves. 


What you need: 

4 large tomatoes 
1/2 pound lean sausage
1 medium onion diced
4 celery stocks diced
sprinkle of Slap yo Mama Creole Seasoning
a dash of cayenne 
1 teaspoon of balsamic or red wine vinegar 
salt and pepper to taste
4 slices of cheese, any kind you like I used Muenster because that is what I had


What you do: 

1. Preheat the oven to 400 F
2. Slice the tops of the tomatoes and keep them (they will be lovely little hats later) 
3. Using a spoon gently take out the tomato innards and put into a bowl. 
4. Cook up in a hot cast iron skillet the onions, celery, seasonings (and the sausage unless it is cooked already)
5.Mix the tomato guts, sausage, most of the basil, cayenne, balsamic vinegar, and salt and pepper in a bowl 
6. Fill the tomatoes with the sausage mixture
7. Top each tomato with a slice of cheese and the little tomato hat
8. Cook for 20 minutes or in my case how long it takes me to sing my little one to sleep 
9. Serve with a smile on your face and love in your heart and a big glass of Chianti

As always, much love, many blessings and happy garden to tabling!  


Thursday, May 15, 2014

Cucumber, celery, apple and lemon juice


This is by far my favorite juice. According to some of the juicing blogs I frequent cucumber has a cooling effect, very desirable in the hot Virginia blackberry summer. I also read that celery is a known stress reliever, clearly a status sought by all working moms. So hear goes, this recipe makes a quart. I make it on Sunday afternoons and then keep it in a jar for as long it lasts, usually a day or two for me. 

What you need: 

1 large english cucumber, washed 
1 large bunch of celery, washed
6 or so large apples, washed and quartered
1 small lemon, peeled and quartered

What you do: 

1. Using your juicer, turn on the blade runners
2. Push through all of the fruit and veg
3. Drink happily, clean the juicer soon after, you can compose the pulp

As always, much love, many blessings and happy juicing!

S'more Pops


This is a super easy, super fast treat. I made them for a sip n' see party but you could make them for any occasion, even a weeknight. 

What you need: 

12 or so large marshmallows
6 oz of chocolate chips or bark chocolate chopped
3 large graham crackers crushed 
12 or so paper straws or Popsicle sticks  

What you do: 

1. skewer the marshmallows with the straws
2. melt the chocolate chips in a mug in the microwave, 30 seconds at a time, stirring each time 
3. dip the marshmallow one at a time in the melted chocolate about 3/4 of the way up
4. take the chocolate marshmallow  out of the chocolate and allow the excess chocolate to drip off, shaking slightly 
5. then dip the chocolate covered marshmallow still wet into a bowl of crushed crackers about half way up 
6. allow the marshmallows to cool and harden on wax paper about an inch from each other 

as always, much love, many blessings, and happy chocolate dipping 


Wednesday, March 5, 2014

Crock-pot Beef and Broccoli


Like many working mothers, I love my crock-pot. I have been trying to get ahead of the dinner time-crunch and organize my week with the help of freezer bags and an hour or two on Sunday afternoon, during Freddy's nap-time. Suffice it to say my "cook for the week" journey is a lot like the Mexican - American war, some wins, some loses, and some disasters. Thankfully there is Mexican dictator involved, although my husband might disagree. Nonetheless, this recipe I am happy to report is a definite winner, the trick is to leave out the broccoli and put it in frozen or fresh about 20 minutes or so before you eat.  I do it just as I put on the rice to cook. 

What you need


  • 1 pound of all natural grass-fed beef stir-fry 
  • 1 cup of dark beef consume
  • 1/2 cup of soy sauce
  • 1/3 cup of brown sugar
  • 1 tablespoon of sesame oil 
  • 1 tablespoon of Worcester sauce
  • 1 tablespoon of balsamic vinegar 
  • 3 large garlic cloves minced
  • salt and pepper to taste
  • 1 16 oz bag of frozen organic broccoli florets (or fresh chopped) 
  • cooked rice
  • chili flake (optional)

What you do

  1. Add all of the ingredients save the broccoli and rice into the crock-pot. Cook on high for 2 and a half hours or 4 hours on low. 
  2. Add the broccoli about 20 minutes before you want to eat. 
  3. Make the rice
  4. Enjoy! 

Make-ahead and freezing instructions

  • You can mix all of the ingredients except for broccoli and rice and store in a Ziploc freezer bag. You can either freeze the bag  as it is, or place in your fridge. The ingredients will keep in your freezer for up to 3 days. 


    • Remember to label the bag with the dish 
    • If you freeze the ingredients, you can either thaw and then cook as instructed or you can put the frozen ingredients directly in the crock-pot. If cooking from frozen increase the time to 3 1/2 hours on high or 6 hours on low. 
    As always, much love, many blessings, and happy cooking!


    Skinny Turkey Lasagna

    Suffice it to say that no lasagna is skinny... I mean clearly, let us operate in the realm of truth. Nonetheless, this is a less calorie intensive rendition of this delicious comfort food. I switch out the normal pork sausage for a low fat turkey turkey sausage. I use part-skim and fat-free cheeses. I bulk up the flavor of marinara with balsamic vinegar and a ton more veggies. This is a great freezer meal or you can make ahead and store in your refrigerator a day in advance. 

    What you need


    • 3 stalks of celery diced
    • 2 medium onions diced
    • 1 cup of shredded carrots
    • 1 pound of raw turkey sausage 
    • 3 cloves of garlic minced or micro-planed 
    • 1 tablespoon of salt free Italian seasoning
    • 3 cups of marinara 
    • 2 eggs
    • 16 oz of fat-free ricotta
    • 2 cups of low fat mozzarella 
    • 1 box of no boil lasagna sheets or fresh pasta sheets
    • 2 tablespoons of Parmesan 
    • salt and pepper to taste
    • red pepper flake (optional)
    • basil leaf for serving

    What you do


    1. Make the sauce: In a large non-stick sauce pan over medium heat cook the celery, onions, and carrots. Cook the vegetables for a minute or two. Add the turkey sausage out of the casing. Cook until no longer pink, stirring. If the turkey sticks to the bottom of the pan add some water. Micro-plane in or add the minced garlic, add the Italian seasoning. Then add the marinara. Turn the heat down to low, and allow to simmer while you prepare the rest of the ingredients. 
    2. Make the cheese filling: In a large bowl whisk the eggs and add the ricotta. Stir until combined. Season with salt and pepper.   
    3. Assemble the lasagna: Cover your pan in foil and spray with non-stick spray. Pour a ladle full of sauce into the bottom of 11 X 9 X 3 inch serving dish or lasagna pan. Place the no-boil noodles, one at a time to make a noodle blanket and cover the bottom of the dish. Lots of thin layers is better than 2 thick ones. Layer a few laddles of the sauce. Cover with a layer of raw noodle sheets. Pour about half the cheese mixture, spread into a flat layer, cover with noodles. Repeat with remaining noodles, sauce, and cheese. When at the top, cover the noodle sheets with sauce, then mozzarella and top with Parmesan. You can bake right away or freeze for later. 
    4. Bake: Cook the lasagna covered for 30 minutes at 400 degrees; then uncover the dish for an additional 15 minutes so the cheese can turn bubbly and brown.  
    5. Serve: thinly slice fresh basil leaves. Serve with red pepper flakes and extra Parmesan cheese.

    Make-ahead and freezer directions 

    • The dish will keep in the refrigerator tightly covered for a day. 
    • If you are freezing cover the entire dish in foil. 
    • Write what is in the dish and label with date and cooking instructions. 
    • You can either thaw the lasagna and cook covered for 30 minutes at 400 degrees; or you can put the frozen lasagna in the oven covered in foil for 2 hours at 400 degrees. Either way you want to uncover the dish for an additional 15 minutes so the cheese can turn bubbly and brown.  
    As always, much love, many blessings, and happy cooking!


      Monday, January 6, 2014

      Three Elegant Easy Assemble Appetizers


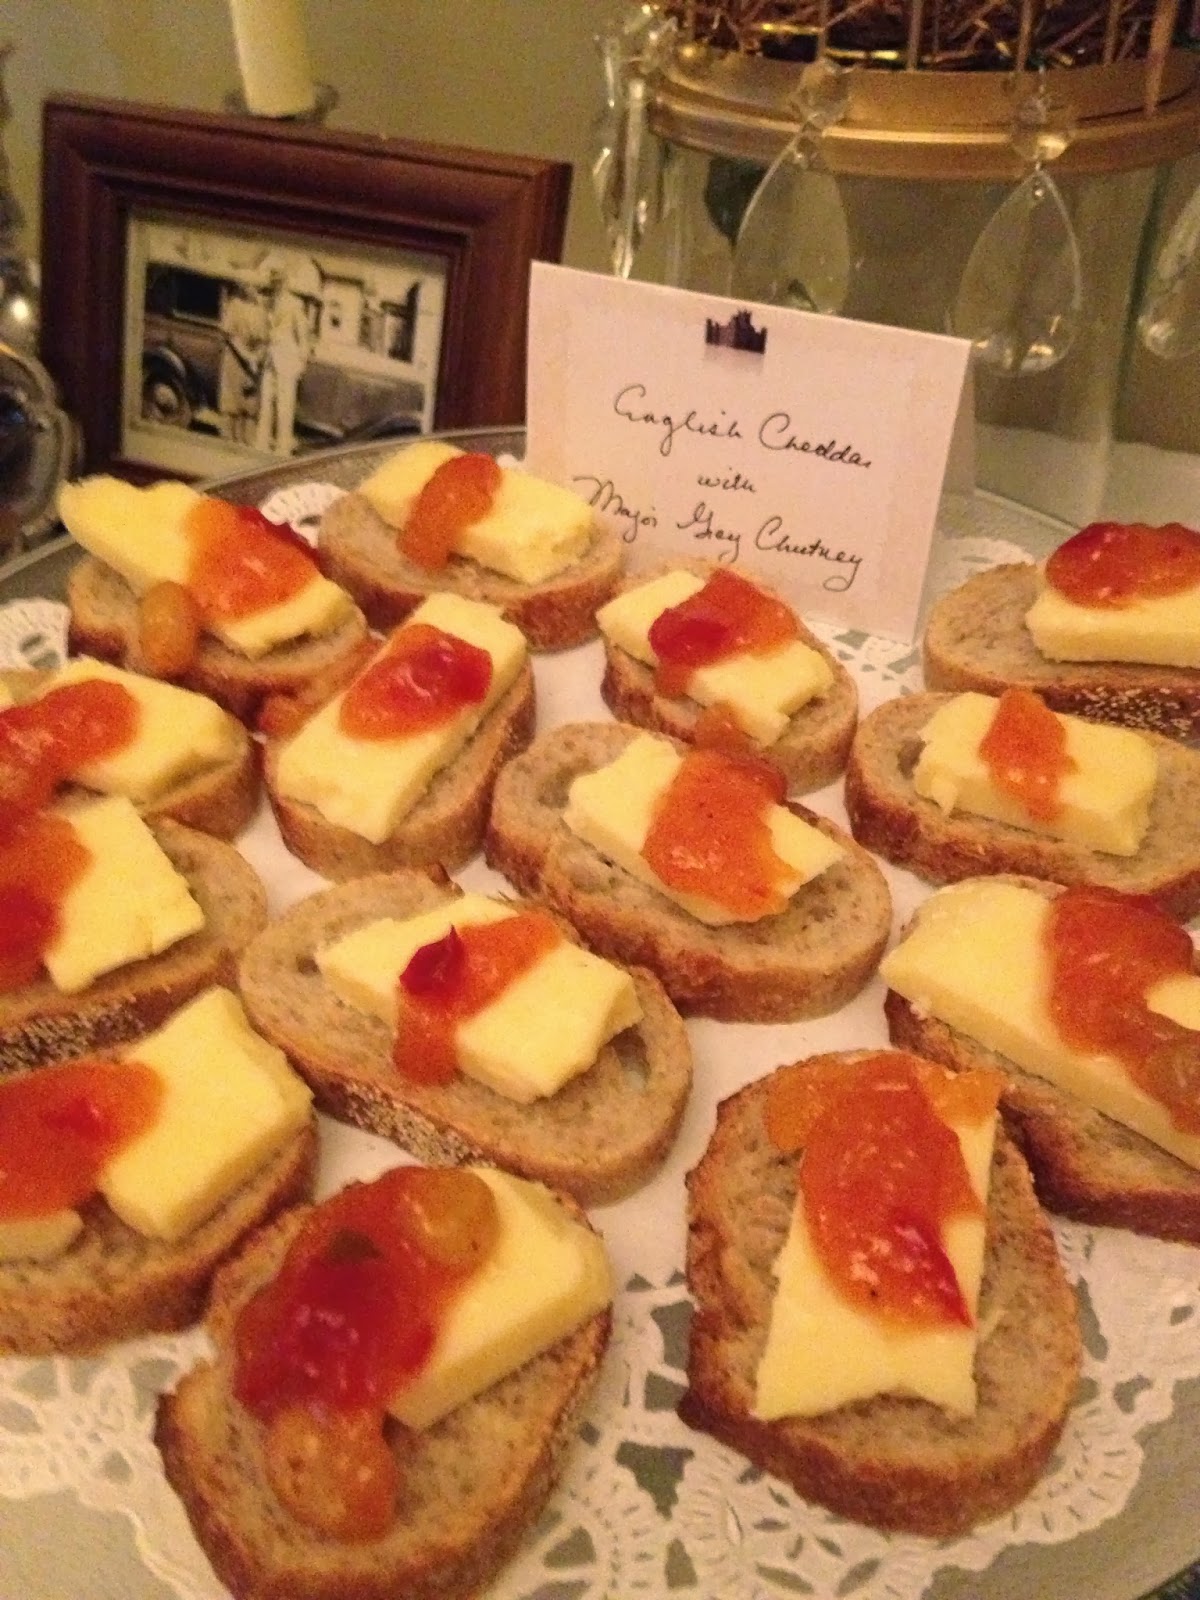
      Normally when I through a party I don't go in for the little finger foods, I usually make one big dish and let everyone serve themselves family style, like a ham or a lasagna. But when dining as they do in Downton, I thought petite snacks were in order. Since I do not have a maid, a cook, and a butler full time attending to my needs, I had to find easy, delicious appetizers. These three appetizers are easily prepped the night before a party, and then simply assembled just before the party. 

      Smoked Salmon Cucumber Rounds

      1 English cucumber
      1 small packet of smoked salmon 
      8 oz of smoked salmon dip (ask your fish counter person) 
      8 oz of cream cheese (softened) 

      The night before

      1. Using a mandolin for easy and even slices cut the cucumber, store in cool water over night in the refrigerator in container with a lid. 
      2. Using a small cookie cutter, or just a knife cut the smoked salmon and store in an air tight container in the fridge. 
      3. Mix the smoked salmon dip and the cream cheese, place in a pastry bag with a star tip in a ziploc bag. 

      Just before the party

      4. Lay the cucumber pieces on a platter, top with smoked salmon, dollop or pipe on the dip. 

      Roast Beef and Onion Marmalade Canapes

      1 wheat baguette sliced (ask the bakery to cut it for you) 
      1/2 pound of garlic and herb roast beef (thin sliced from the deli counter) 
      onion marmalade (or make your own, with 1 onion, 1/2 cup of sugar, and 1/4 cup of balsamic vinegar, salt and pepper) 

      The night before

      1. Store your sliced baguette in a plastic bag so that it does not dry out. 
      2. Lay out the roast beef flat and cut into approximately 3 inch by 3 inch pieces. That meant for me, laying all of the pieces on top of each other and making two cuts, to cut each piece into thirds. Store in the fridge in a zip lock bag. 
      3. Make the onion marmalade: caramelize the onions on medium heat with salt and pepper, stirring occasionally. Add the sugar and stir to prevent scorching. Once the sugar has melted, off the heat add the vinegar. Store in an air tight container in the fridge. 

      Just before the party

      4.  Lay the baguette slices on a platter, top with roast beef, dollop on the onion marmalade. 

      English Cheddar and Major Grey Chutney Canapes

      1 baguette sliced (ask the bakery to cut it for you) 
      1/2 pound of good english cheddar
      Major Grey Chutney

      The night before

      1. Store your sliced baguette in a plastic bag so that it does not dry out. 
      2. Slice the cheese into half inch thickness, don't worry so much about the length, a good quality cheddar will break a little bit. Store in the fridge in a zip lock bag. 
      3. Leave the chutney in the jar, just don't forget where you put it. 

      Just before the party

      4.  Lay the baguette slices on a platter, top with cheese, dollop on the chutney. 


      As always, much love, many blessings, and happy party. 

      Thursday, December 12, 2013

      Easy Cream Biscuits


      As far as baking homemade bread, nothing gets easier than cream biscuits. They take no time to stir up, there are only 2 ingredients, and you can make them in your muffin pan so you just drop them and they pop up perfect every time. This is my go to for lazy winter breakfast treat. Serve it with good homemade jelly, or butter, or gravy... yum gravy. 

      What you need: 

      2 cups of Self-Rising Flour
      1 cup of heavy cream 
      muffin tin
      non-stick spray

      What you do: 

      1. Preheat your oven to 450 degrees F. 
      2. Mix the flour and cream together just until it combines
      3. Drop dollop fulls into a greased muffin tin
      4. Bake for 10 minutes
      5. Enjoy, greedily with coffee and pepper jelly 
      As always, much love, many blessings, and happy Christmas!


      Homemade Shallot, Currant and Cranberry Sauce


      I love cranberry sauce, I love it on everything. This year I choose to dress up mine with some excellent bourbon, shallots, butter, dried currants and of course, cranberries. I love to eat it cranberry sauce but I also love to make it. It is so tootin easy. So, please do make some and enjoy you for your holiday season. 

      What you need: 

      1 tablespoon of butter
      2 shallots diced
      1/2 cup of dried currants
      1 bag of fresh cranberries
      1/2 cup of honey
      1 oz of bourbon
      salt to taste

      What you do: 

      1. Saute the shallots with butter over medium heat until tender and translucent. 
      2. Add the currants, cranberries, and honey. Cook over medium heat until the cranberries burst, stirring occasionally to ensure the bottom does not scorch. 
      3. Add the bourbon and cook for another minute or two. 
      4. Let cool off of the heat and enjoy. 
      As always, much love, many blessings, and happy Christmas! 


      Tuesday, October 29, 2013

      Barley with Sweet Potato and Andouille Sausage

      I am loving this new cookbook One Pan, Two Plates: More Than 70 Complete Weeknight Meals. This meal is a fantastic weeknight fall meal. Start to finish it takes about 45 minutes, but much of it can cook while you check your email or empty the dishwasher. I amended some of the recipe based on what I had in the house. 


      What you need: 

      2 cups of chicken broth
      2 tablespoons of olive oil
      2 green onions
      1 large sweet potato, peeled, cut into 1/4 inch dice
      1 cup of pearled barley (also called 10 minute barley)
      1 cup of diced andouille sausage
      salt
      3/4 cup of white wine
      1/2 cup of Parmesan 
      2 tablespoons of fresh basil
      1/4 cup of frozen peas
      zest of 1 lemon
      2 tablespoons of butter
      1/2 cup of half and half 
      pepper to taste


      What you do: 


      1. Pour the vegetable broth into a glass measuring cup and microwave on high for 3 minutes. 
      2. Heat the 12 inch cast iron skillet over medium-high heat and add the olive oil. 
      3. Cook the white parts of the green onion, sweet potato, barley, sausage, and 1/4 teaspoon of salt. 
      4. Toast the barley and render the sausage.
      5. Add the wine and scrape the bits of flavor from the bottom of the pan. 
      6. Add the hot stock and cook for about 10 minutes. Taste and check doneness, the barley should be al dente. 
      7. Add the cheese, basil, peas, lemon zest, butter and half and half. 
      8. Taste and adjust seasoning garnish with
        green onions and cheese shavings. 
      As always many blessings, much love and happy cooking. 


      Thursday, September 19, 2013

      Roasted Spaghetti Squash with Parmesan and Pepper


      Roasted Spaghetti Squash with Parmesan and Pepper

      Roasted winter squashes might be one of my favorite parts of fall. This is an easy no fuss and healthy dinner that even you’re most avid carnivores and “carbivores” will enjoy with gusto. While the squash takes a while to roast, you don’t need to do anything while it roasts, and then you can throw everything together in under 10 minutes. It is based on a classic Roman dish Spaghetti Cacio y Pepe. I just replaced the spaghetti with squash... cute huh? 

      What you need

      1 large spaghetti squash (about 5 pounds)
      4 tablespoons olive oil
      Kosher salt
      Freshly ground black pepper
      2 medium garlic cloves, finely chopped
      3/4 cup finely grated Parmigiano-Reggiano cheese, plus extra for serving

      What you do


      1. Heat the oven to 400°F and put a rack in the middle
      2. Cut the squash in half lengthwise and scrape out the seeds
      3. Brush the flesh with a tablespoon of the olive oil and add a good sprinkle of salt and grinds of pepper
      4. Put the squash cut side up on a cast iron skillet or a lined baking sheet.
      5. Roast for about an hour until fork tender
      6. Let cool, so you don’t burn your hands, and using a fork scrape out your “noodles”
      7. In a cast iron skillet heat olive oil over medium heat.
      8. Add chopped garlic, salt and pepper
      9. Cook until lightly brown and fragrant, about 2 minutes
      10. Turn off the heat
      11. Add the squash and toss
      12. Add cheese a little in at a time so it melts into the dish slowly
      13. Serve with a nice Chardonnay and an easy green salad for a perfect early fall evening
      As always, many blessings, much love, and happy cooking!

      Tuesday, September 17, 2013

      Heirloom Tomato Pie with Homemade Ricotta


      Heirloom Tomato Pie with Homemade Ricotta

      Tomato Pie! This is a Old Southern Recipe that I modernized with the inclusion of ricotta and removal of mayonnaise. I call these recipes "Charm Recipes" because that is what they are, charming. Oh... and it is delicious! Think deep dish pizza with juicy chunks of tomato instead of sauce.

      What you need:

      4 large ripe tomatoes
      20 or so basil leaves
      8 oz of fresh mozzarella
      1/3 cup of ricotta
      salt
      pepper
      olive oil drizzle
      pastry dough (store bought or your favorite recipe) 

      What you do:

      1. Preheat your oven to 400 F
      2. Roll out your pastry dough and place in an oiled cast iron skillet or greased pie plate
      3. Cut up your tomatoes, basil leaves, and mix in mozzarella, ricotta, salt and pepper
      4. Push the pie dough with your fingers into the skillet or pie plate 

      5. Prick with a fork, and bake alone for about 10 minutes.
      6. 
      Place tomato mixture in pie shell and drizzle with olive oil
      7. Bake for 35 minutes or so, until the top is brown and bubbly

      Bonus Recipe: Homemade Ricotta


      What you need:

      2 quarts of whole milk
      1 cup of heavy cream
      2 Tablespoons of white vinegar
      1/2 a teaspoon of kosher salt
      1 large saucepan
      thermometer
      cheesecloth
      colander
      large bowl

      What you do:

      1. Heat the milk and cream until it reaches 180 degrees F
      2. Take off the heat and stir in the vinegar, and stir for 30 seconds
      3. Stir in the salt, and stir for another seconds
      4. Set a folded quartered cheesecloth in a colander and set in a large bowl
      5. Gently pour the milk into the cheesecloth lined colander/bowl
      6. Leave to drip on the counter for about 20 minutes or alternatively you can set in the fridge over night and allow the whey gently to drip out.

      As always, much love, many blessings, and happy baking!


      Thursday, June 27, 2013

      Shell Cookies


      This was my latest Cape Cod baking treat, pink cookies shaped like shells with blue frosting and a yogurt raising posing as a pearl. They are adorable and super easy to make.

      What you need:

      1 Tube of pre-made sugar cookie dough
      1/4 cup of flour plus more dusting
      blue and red food dye
      yogurt raisins
      vanilla icing 
      black gel writer
      Special equipment: shell cookie cutter and parchment paper

      What you do:

      1. Mix the cookie dough, a few drops of red food dye to the desired color and 1/4 cup of flour, using your hands to kneed the dough together. Pop it in the freezer for a few minutes to re-harden.
      2. Roll out your dough about 1/4 of an inch thick and cut with the cookie cutters.
      3. Preheat your oven to 350 degrees F.
      4. Place your cookies on parchment paper and place in the freezer to harden for 10 minutes
      5. Bake the cookies for 8 minutes or until the edges are slightly golden, longer if you want a crisper cookie.
      6. Cool on a wire rack
      7.  Add a drop of blue food coloring to some icing, or as much color as you like. 
      8. Put about a tablespoon of blue icing on the center of the bottom cookie. Add a yogurt covered raising and top with another cookie.
      9. Gently add two eyes using black gel writer.
      10. Enjoy!

      As always, much love, many blessings, and happy sea critter baking!

      Monday, June 3, 2013

      American Flag Sheet Cake aka Freddy Cake

      On a sweltering 4th of July, I was very 9 months pregnant and fairly certain I was never going to see my feet ever again. My friend Leslie came over to help me make a American Flag Cake because I was going to have this baby, so we needed a birthday cake. My husband made ribs and we made a pepper slaw. After we ate the cake, we watched some of the fireworks and by 9 pm Freddy was one his way. 

      My dear friend Leslie only believes in chocolate cake, and for that purpose this recipe is a chocolate cake. You can make the chocolate cake in advance and decorate before serving, which I recommend for two reasons. First, it means you can use real whipped cream and the second reason is you don't want your berries to get all mushy in the fridge and ruin your cream. 

      What you need for the cake:
      2 cups all-purpose flour
      2 cups sugar
      1 teaspoon baking soda
      1/4 teaspoon salt
      1 cup butter
      1/3 cup unsweetened cocoa powder
      2 eggs
      1/2 cup buttermilk
      1 1/2 teaspoons vanilla

      Cake Preparation:

      1. Grease and flour a 13X9X2-inch baking pan; set aside.
      2. In a large bowl, combine flour, sugar, baking soda, and salt; set aside.
      3. In a medium saucepan combine 1 cup butter, 1/3 cup cocoa, and 1 cup of water. Bring mixture to a boil, stirring constantly. Remove from heat.
      4. Put the chocolate mixture and the dry mix into your food processor and buzz until mixed.
      5. Add eggs, buttermilk, and vanilla. Buzz again, the batter will thin.
      6. Pour batter into the prepared pan.
      7. Bake in a 350° oven about 30 until a toothpick inserted in center comes out clean.

      What you need to decorate: 

      Whipped cream, cool whip, canned what ever your persuasion
      1 pint of blue berries
      1 quart of strawberries

      Decorations: 

      1. Cover your cake with desired whipness. 
      2.  Clean and quarter your strawberries. 
      3. Using the blueberries, gently press into the cream forming a rectangle in the upper left hand corner. 
      4. Make red stripes by lining your strawberries 

      Enjoy! 


      No Bake Strawberry Pie


      This is my new all time favorite Summertime dessert. It is hard to believe that something this easy and this quick could be so darn tasty. It won third place in my office patriotic bake-off. By all means please use this recipe, pass it off as your own, sell it on the black market, but please make it for you and your family. 

      What you need: 
      Graham cracker pie shell
      Quart of strawberries
      3 Tablespoons Strawberry Jello
      2 Tablespoons  cornstarch 
      1 cup of sugar 
      1 cup of hot water


      What you do: 
      1. Unwrap your pie shell and fill with as many cleaned and cut strawberries as you can fill it with. 
      2. In a heavy bottomed sauce pan, off the heat, mix the Jello, cornstarch and sugar together. 
      3. Add the hot water. Cook on medium heat until the mixture comes to a boil, stirring the entire time. 
      4. When thickened pour over your strawberries. Allow the pie to cool to room temperature. Cover and place in the fridge for 2 hours until the pie is set. 
      5. Enjoy with whipped cream, ice cream, or alone standing in front of your fridge eating it with your fingers. 

      As always, many blessings, much love, and happy no-baking pie making. 


      Thursday, February 21, 2013

      Blood Orange Marmalade


      I love orange marmalade. I think it because my mother is Spanish, most orange marmalade is made from Sevillian Bitter Oranges. I also love making my own jams and jellies. It is easy, economical, and makes great presents. I had some blood oranges that were past their prime and I thought they would make perfect marmalade… I used Ina Garten’s method to make it without pectin or thickener.

      What you need:
      6 large seedless blood oranges
      8 cups of sugar
      8 cups of water

      What you do:
      1. Thinly slice your oranges, I used a mandolin which works beautifully.
      2. Add oranges and water to the large pan over medium heat until it comes to a boil.
      3. Turn off the heat and add the sugar, stir until dissolved.
      4. Leave uncovered overnight.
      5. The next day, heat the mixture on high until it reaches a boil. Reduce the heat to low and let the mixture simmer uncovered for two hours. Turn the heat back to medium and boil gently until the mixture reaches 220 degrees F.
      6. Test the mixture by putting a spoonful on a plate and refrigerate  It should be cool to the touch and neither runny nor hard. If it is hard add more water, if it runny than add more sugar.
      7. Pour into sterilized mason jars. Seal with lids.

      15 minute Banana Oatmeal Breakfast Cookies


      I made these last night, and I am practically evangelical about them. They are only 2 ingredients, fat free, vegan, easy, fast, a great use of bananas past their prime, and they are delicious. They taste like an oatmeal banana cookie. I am sure you could mold them into any shape and add peanut butter, raisins, or chocolate chips if you wanted...

      What you need: 
      2 brown bananas
      1 cup oats 

      What you do: 
      1. Preheat the oven 350. 
      2. Mash the bananas and mix the oats in. 
      3. Scoop on to a parchment lined baking sheet. 
      4. Bake 15 minutes. 
      5. Enjoy anytime with milk... viola breakfast cookies. 

      Hope you try them... they are awesome.

      All the best, many blessings, much love, and happy baking. 

      Friday, February 8, 2013

      Oreo Truffles

      This is less of a recipe and more of a concoction  but it is a lovely and delicious concoction  I needed something bite-size I could bring to a Super Bowl Party. My son loves Oreo's and who doesn't love chocolate... so here you go.

      What you need:
      1 package of Oreo's
      1 8 oz package of cream cheese softened at room temperature
      Melted chocolate

      What you do:

      1. In an food processor chop up the Oreo's. Add the cream cheese and cream together until it is one mashed up deliciousness. 
      2. Form balls with a small ice cream scoop. Freeze on a large sheet pan and once frozen (about an hour) roll in the melted chocolate and allow to harden. If you would like to decorate feel free to add sprinkles or drizzle a different color of chocolate. 
      3. You can eat them straight away, or you can store in the refrigerator for a week or in the freezer for two months. 
      Enjoy with milk and football. 


      Friday, January 18, 2013

      Butternut Squash Risotto in 20 minutes


      I love Butternut Squash, and so does my little one. Which is a bonus, when you can get away with only making one dish for the family. But did you know you can make it in 20 minutes... no really... from scratch.

      Here is what you need:

      1 large butternut squash peeled and cubed into about 1 inch long
      4 cups of chicken stock or vegetable stock
      1 cup of arborio rice
      1 shallot diced finely
      1 Tablespoon of butter
      1/2 cup of white wine (and more for you)
      salt and pepper to taste
      1 teaspoon of dried thyme
      shaved Parmesan to taste

      Here is what you do:
      1. Preheat your oven to 400 degrees F. Cut and cube your squash and lay on sheet pan. Bake for 20 minutes.
      2. Set two pots next to each other on the stove. 1 will be to keep the stock warm the other to make your risotto.
      3. Warm your stock on low heat.
      4. In the other pan add your diced shallot, rice, butter, thyme, salt and pepper and toast the rice on until they are slightly golden.
      5. Add your wine and stir until absorbed. I love this part, 18 minutes of quiet, stirring a pot.
      6. As the liquid becomes absorbed in the rice, continue to stir while adding another ladle-full of hot stock. Continue to do this until the rice is cooked, about 18 minutes or so.
      7. Once cooked. Turn off the heat, add the hot butternut squash from the oven. They will be tender and easy to mix into your risotto. According to your like, mix in the squash or mash it in. I prefer chunks maintained, but I tend to squish with my fork when it is in my bowl. Sprinkle with shaved Parmesan and serve with Pinot Grigio. Enjoy

      As always, much love, many blessings, and Happy Cooking!!!

      Friday, November 30, 2012

      25 Days of Cookies: Day 2 Leslie Cookies aka Chocolate Cake Mix Cookies

      So my best friend Leslie, loves these cookies. Her mom calls them Leslie cookies, and whatever Mama Bear calls them, so do I.

      I'm blogging these not because they are my recipe, I'm sure the credit goes to a large corporation. But because they are Leslie's favorite, and I need the recipe to be Google searchable under her name :). Thus... Leslie cookies.

      What you need:

      1 box of chocolate cake mix
      1 egg
      1 stick (1/2 a cup) of softened butter
      2 Tablespoons of water
      powdered sugar to roll the dough balls in

      What we did:

      1. Preheat your oven to 350 degrees F
      2. Mix all the ingredients, and spoon into your hands to roll into balls
      3. Rolls the balls in powdered sugar and place on to parchment paper covered baking sheets
      3. Bake for 10 minutes and Voila Leslie Cookies.

      You can store them in an air tight container for a couple of days. They are the only cookies that Freddy likes better than Oreos.

      Do as we did, and enjoy with wine while decorating the tree listening to the White Christmas Musical.

      Happy Christmas! As always, many blessings, much love, and Happy Baking!