Friday, February 27, 2009

Cardamom Carrot Cupcakes filled with Creme Cheese Frosting


Spring is coming. In celebration of this wonderful season knocking on our front door, cardamom carrot cupcakes with a smooth crème cheese frosting. I love anything that mixes my favorite two ingredients exotic spices and fresh produce.

In Northern Africa and India in the souks they have these incredible outdoor spice markets. Oil drum sized burlap sacks filled with whole spices in pools of orange grains, golden shavings, red kernels. The street is perfumed with the aromatic incitements of 7 continents. Like sirens calling you, the scent entices you to hand over your last Yankee dollar for what the boisterous peddler bellows. We don’t have that in the US, unfortunately we don’t the same love affairs with spices either. I like to think it is due to our rugged nature and our modern refrigeration. Nonetheless, when it comes to spices, always buy fresh in small quantities and grind your own. For this recipe I used, cardamom, ginger (technically not a spice, but whatever), pepper, cinnamon (canella), clove, sea salt and nutmeg. The result is a cupcake with layered flavors but not an overpowering spice taste. It’s a cupcake for goodness sake not vindaloo curry.

To make this cupcake special, I played around with spice blends and used more exotic Indian ones, but cardamom is easy to find in any supermarket. I also fill the cupcake and ice the top with a simple but delicious cream cheese frosting; I call it crème cheese frosting because I add crème friache to give it a whippy tang.


Cardamom Carrot Cup Cake

2 ½ cups of flour
1 ½ teaspoons baking powder
2 teaspoons baking soda
2 teaspoons cardamom
1 teaspoon freshly ground ginger
¼ teaspoon pepper
2 teaspoons cinnamon (canella)
¼ teaspoon clove
1 teaspoon sea salt
½ teaspoon nutmeg

1 ½ cup of sugar
½ cup brown sugar
1 ¼ cup of oil
4 large eggs
1 teaspoon of vanilla
3 ½ cups of shredded carrots (go ahead use the food processor save your hands)

To make the cupey cakes:

Heat your oven to 350 F. Get a cheapo thermometer and test your oven, very rarely are they calibrated properly. For my little oven, 375 markings on my oven dial really means 350 F in reality.

Using a coffee grinder add your spices and create your spice blend. For cinnamon I blitz it in the food processor then the coffee grinder. You would be amazed the difference and it’s a little vacation for your nose.

Add your spice blend to the rest of your dry ingredients and set aside. Remember sugar is not a dry ingredient because it melts when heated.

In your favorite standing mixer let the oil and sugars get well mingled and add one egg at a time. Add the vanilla and carrots. While your wet ingredients are getting acquainted, set up your muffin tins.

In your muffin tins, add cup cake liners and Pam everything up. I mean everything, the tins, the liners, the top of the tins, your children if they are around. You don’t want the cupcakes to stick to anything.

Add the dry ingredients to your wet ones in the standing mixer. And let the mixer go until just incorporated. I took an amazing cake baking class last weekend. The instructor Amy Riolo http://www.amyriolo.com/ said: “when it comes to cakes under mix, when it comes to frosting over mix.” Awesome class, awesome lady.

When just combined spoon into your prepared cupcake liners.

Bake for 26 minutes or until a toothpick comes out clean. It is soft and airy batter, so don’t worry if they pop up.

Let cool on a rack.

Now comes the fun part icing and filling.

Crème cheese frosting
1 8oz package of cream cheese softened
1 stick of butter softened
1 lb roughly 2 cups of powdered sugar
2 Tablespoons of crème friache

Add all of your ingredients to standing mixer and let her whip, and whip, and whip. Until you have a light airy delicious frosting.


To ice and fill.

I fill a disposable pastry bag (I got 50 at Wal-Mart for $3) fitted with star tip and fill the bag with the icing.

Push the tip into the cupcake top and squeeze until you feel slight resistance. Your cup cake is filled.

Ice the top as you desire. I liked the little star shape the filling the cup cake makes so I continued to make the little star shape all over the cup cake.

Enjoy. Go forth use spices, make cupcakes, and express yourself.

As always, much love, many blessings, and happy baking.

Thursday, February 26, 2009

Mini Chicken Pot Pies


I love chicken pot pies, they are like little chicken hot tubs of creamy goodness. I especially love them with big chunks of chicken and when the veggies are still crisp.

With cold months waning, it seems only appropriate to lick the last spoonfulls of comfort food in anticipation for fresh farmers markets springing up. I’ve made a cheaters chicken pot pie to enjoy on a cold evening. When baked the creamy filling oozes out the sides of the golden crusty mini pies. The taste fills your mouth with the luxury of creamy comfort, crisp veggies, and flaky crust. What could be better?

Why is it a cheater’s pie? Well, I used: boneless skinless chicken tenderloins; frozen cut carrots, corn, peas, and green beans; and "bakers gasp" store bought pie crust. What can I say… I’m bad, I cheated… I admit. But you can be bad too, if you wanna. Or you can roll out your own crust. If I had a large food processor, I would. Excuses, excuse… back to the recipe!

Creamy Sauce:
2 Tablespoons of buttah
2 Tablespoons of flour
1 cup of milk
A pinch of freshly grated nutmeg
Salt and pepper to taste

Filling:
2 Tablespoons of Olive Oil
1 chopped yellow onion, medium size
2 chopped stalks of celery, medium size
2 cups of frozen vegetable medley, any kind, I used an organic variety
1 lb of boneless skinless chicken tenderloins, again I used an organic variety
2 Tablespoons of dry white wine or vermouth
1 pot of creamy sauce

Pie Crust:
2 Rolled Premade Pie Crust (Bless you Pillsbury)
A few shakes of flour to keep the crust from sticking
1 whisked egg for brushing on the crust
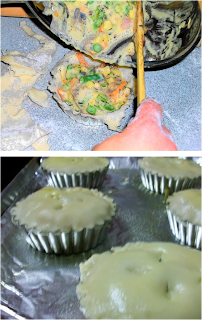
1. Prepare your mini tins with Pam and set on a foil covered baking sheet. This recipe made six mini pies.

2. Make your filling

a. Vegetables first: heat a large skillet with 1 Tablespoon of olive oil and sweat the chopped onions and celery until slightly translucent but still crispy, the vegetables will continue to cook in the pie. When cooked but still crunchy add the frozen vegetable medley and take off the heat. Remove from the skillet and place in a large bowl set aside.

b. Chicken next: in the same large skillet, don’t bother cleaning it. Add the other Tablespoon of olive oil and dice up your chicken. Add salt and pepper to taste. Cook until chicken pieces are cooked through. Add the chicken to your veggie bowl.

c. (Don’t clean the pan!) Wine sauce bit. Take your “dirty” delicious skillet and set over medium heat. Add the wine or fortified wine and with a wooden spoon stir the wine until it has taken up all the yummies off the bottom of the skillet. It will only take a minute don’t let the wine evaporate. This is good for two reasons, you don’t loose any delicious flavor, and two it makes cleanup much easier. Add the sauce to the veggies and chicken.

d. Creamy Sauce Bit: melt the butter in a sauce pan over medium heat. Add the flour before the butter is completely melted. With a wire whisk cook the flour and butter until they are a light brown almost caramel color. You don’t want it to burn but you do want to cook some of the raw flour taste out. The longer you cook this mixture the less chance you have at the sauce thickening up complete. Add your milk and continue to mix until the butter/flour paste is fully incorporated. Add your spices over the heat and continue to mix until you have a thick and creamy sauce. It only takes a few minutes. Add your creamy sauce to the veggies, chicken, and wine.

e. Fix all of the ingredients and taste. Add seasoning as required. Allow your filling to cool while you assemble your pie crusts.

3. Pre-heat your oven to 400 degrees F

4. Assemble your mini pies

a. Cut your pie crust to fit your molds. Remember to save enough dough to make the tops.

b. Fill the bottom of your molds or mini pie plates with the crust.
c. Brush with the egg wash. You can use a pastry brush, or like me, I use whatever I have close at hand including my fingers. This time I used a new paint brush.

d. Fill the pies just to the top with your delicious creamy filling. I admit I usually overfill. But in truth, I’m guilty of overfilling just about everything from pies to laundry baskets to friend’s stomachs.

e. Take your pie tops and pinch the tops and bottoms of the pastry together.

f. Brush the tops with your egg wash

g. Take a sharp knife and make steam vents in the top crust

5. Bake your mini pot pies in pre-heated oven for 25 to 30 minutes until the pies are golden brown and the gooey delicious filling is bubbling outside just a little.

6. Let cool on a wire rack.


I hope you get to use this recipe and make someone stomach and heart warm.

As always, much love, many blessings, and happy baking.

Friday, February 20, 2009

Apple Dutch Cake


You know in your closet… how you have your favorite pair of jeans or maybe it’s a black sweater. You wear it all the time, dress it up, dress it down, it’s super comfortable so you wear it even when no one is around. I have a cake recipe for you… the preverbal favorite pair of jeans for your recipe armoire. You can dress it up, dress it down, add any fruit you like, ice it, dust it, or leave it plain. It’s delicious no matter how you slice it or accessorize for that matter.

Today I choose to dress it down, putting the fruit on top making a sort of rustic Danish, and then lightly icing it to make it appetizing.

The cake is simple enough
1 ½ cup of flour
½ cup of sugar
½ teaspoon of salt
2 teaspoons of baking powder
1 egg
½ cup of milk
1 teaspoon (or cap full) of pure vanilla extract
1 stick or ½ cup of butter melted … sorry, I mean buttah… shout out to my brother.

Preheat your oven to 400 F. Pam up your baking vesicle of choice.

Mix all the dry in the standing mixer. Mix all the wet in another bowl, I used the measuring cup I melted the buttah in. Turn on the mixer to start the party, with the dry ingredients. While the dry ingredients mingle, add the drinks. (Then add the wet into the dry.) It will take less than a minute for the two to combine, much like a regular party. When the two are happy together, pour into your buttered pan.

Voila… (Do you know that the French and the French Canadians actually say that a lot? It is surprisingly not a stereotype, they really do it.)

It needs about 25 minutes tanning… baking, and your done.

I dressed mine up with apple Dutch topping:

1 uber larger granny smith apple, peeled and sliced
½ cup of sugar
1 teaspoon of freshly ground cinnamon
2 tablespoons of golden raisins

Place the apple slices into the batter making a decorative pattern. Mix together the sugar, cinnamon and raisins in a bowl. Sprinkle over top… ready? Voila. Bake at 400 F for about 35 minutes or until a toothpick comes out clean.

For this rendition, I choose to accessorize with classic icing glaze. But really you could do anything with this recipe, any fruit, any topping. Chocolate chips, pineapple upside down or right-side up cake, cranberry upside down cake… whatever your heart’s desire, or whatever you have in your fridge. My only caution is that you taste the topping on its own. It should taste good raw, you don’t want it to be too tart. My rule with baking is, if doesn’t taste good raw, it won’t taste good baked. That is not the same with ground beef, please don’t try raw ground beef.

Hope you come up with many wonderful expressions of your personal style with this cake.

As always, much love, many blessings, and happy baking.


Wednesday, February 11, 2009

Almond and Apricot Whole Wheat Bread


Quick bread, a marvelous cooking innovation that just perfect for the instant-gratification, buy-now pay-later, Seven11 at 2 in the morning kind of society we have become. Think about it: homemade bread, in under an hour. We have the delicate aroma of homemade bread wafting from the oven as dinner is being made while still being able to work over time for that project that just popped up at 4pm.

Here, is a wonderful recipe for whole wheat high-fiber bread that can be made in under an hour. The scent of the orange extract just perfumes the house with a heavenly scent of fresh baked bread. It is worth making the bread for the smell alone. Have less time… no problem, all quick breads make marvelous muffins by increasing the temperature to 375 F and reducing the baking time to 22 minutes give or take.

1 1/2 cups of hot water
1 1/2 cups dried apricots -- blitzed in a food processor
2 tablespoons buttah
1/2 cup maple syrup (i used sugar free... weight watchers... ewww)
1 egg
1 teaspoon orange extract
1 1/2 cups unbleached flour
1 cup flour, whole wheat
1 teaspoon salt
1 teaspoon baking soda
1/2 teaspoon baking powder
1 cup sliced almonds, chopped/sliced/whatever

1. Preheat your oven to 350 degrees F.
2. Take your measuring pitcher and heat up the water in your microwave or from your kettle rehydrate the dried apricots. Once soft, add the water and the apricots to the standing mixer.
3. Add all of your ingredients to mixer in the order they are listed and let mix until dough seems sticky and well incorporated.
4. Grease your loaf pan or baking receptacle of choice.
5. Bake for 45 to 50 minutes or until a dark crust has appeared, and a toothpick comes out clean.

Enjoy a thick slice with dinner and some nice buttah…

As always, much love, many blessings, and happy baking.