Tuesday, December 21, 2010

Homemade Ho-Ho-Ho's


Around Christmas everyone loves sweets, but I am continously on the search for sweets that are good but not overly trite and Christmassy. Thus, I find myself in a play on words, HO... HO... HO... Everyone loves little Debbie. What is not to love, sweet treats perfectly wrapped in cellophane and always waiting on you adoringly for your snack time. So here is my easier more natural version of these little delights. Three components, cake, icing, ganache. Ganache, a fancy way to say chocolate and cream melted together to make a delish topping, more sophisticated than frosting but just as delicious.

Chocolate Cup Cake
Ingredients
1 stick of butter melted
3/4 cups of self rising flour
2 tablespoons of cocoa, dutch or best available I love Valrhona
7 tablespoons of sugar
2 large eggs
A splash of vanilla
A splash of milk


Method

1. Preheat your oven to 400 degrees.
2. Melt the butter in a bowl in the microwave or any way you find it easiest.
3. In a food processor add all the ingredients.
4. Fill a muffin tin with liners and half full with the batter
5. Bake for 20 minutes
6. Let cool on a wire rack

Chocolate Ganache

Ingredients

8 ounces of best quality chocolate
1 cup of cream

Method

1. Heat cream on low fire, until just before simmer point.
2. Pour in chopped chocolate and stir until creamy
3. Dip cooled cupcakes face first into vat of deliciousness
4. Dip head face first into vat of deliciousness (optional)

Vanilla Icing

Ingredients

1 cup of powdered sugar
1 stick of softened butter
2 teaspoons of vanilla

Method

1. Cream together in standing mixer or with a very strong arm
2. Fill a pastry bag with a star tip
3. Impale the cooled cupcake in the top center and fill until the cupcake begins to bulge
4. Leave with beautiful star tip

Viola! Perfect, natural ho-ho's. Perfect for Christmas... and one jolly red-suited man known for saying Ho Ho Ho and having a notorious sweet tooth...

Friday, September 10, 2010

Milk Chocolate Soufflé


I must admit, I have always been terribly afraid of soufflés. But I have been recently liberated of that fear, and you should be too. I think I was timid because I grew up listening to Julia Child telling me I had to be quiet in the kitchen or the soufflé will fall. Or that any number of voodoo magic tricks would be necessary to make the temperamental soufflé actually appear. Well, I am happy to report that no voodoo, silence or expensive french cookware that I could only procure on the black market is necessary. Suffice it to say, my fears were unfounded and I hope you will try this super simple and easy recipe at home. This recipe makes two single servings, but feel free to double or triple.

Ingredients

2 eggs separated
butter for the dish
1 Tablespoon of milk
1 Tablespoon of flour
2 Tablespoons of sugar
1/3 cup of milk chocolate chips (melted in the microwave gently in 30 second increments, remember to stir, they sometimes don't look melted but they are)

Method

1. Preheat your oven to 375 F or 190 C
2. Set out your two little baking ramekins. Butter well and sprinkle sugar on the sides.
3. Separate the egg yolks from the whites.
4. Place the egg yolks in one bowl with the milk, flour, sugar, and melted milk chocolate. Whip together.
5. Whip the egg whites in a separate bowl. Be careful that there are no yolks in the whites, if they are, make an omelet with those eggs and start over. Whip them to stiff peaks or when you can turn the bowl upside down with no movement. I used a milk frother. I love my milk frother I whip egg whites, make salad dressing, anything that is small and I don't want to drag out or dirty the large mixer.
6. Stir about have the whipped whites into the chocolate mixture to lighten. When completely incorporated fold in the other half the whites.
7. Spoon into two ramekins
8. Bake for 20 minutes or until the top is completely puffed, a little cracked, and a tooth pick comes out clean.
9. Enjoy greedily with a side of ice cream, some cinnamon, and drizzle of caramel.

As always, much love, many blessings, and happy baking.

Spinach, Rasberry, Goat Cheese, and Marcona Almond Salad


This is a fresh, light, and delicious salad. There is no dressing, and it is a snap to make. But the flavor profile of the crisp herby spinach, sweet and sour burst of rasberry juice, the creamy salty goat cheese, and the crunchy rich nutty taste of the almonds all sing together in a chorus that resounds of late summer freshness.

This is more of a flavor profile than a recipe but please choose amounts as you need. This amount fed two very greedy people and left more for me to take to lunch the next day.

Ingredients

1 five-ounce bag of washed baby spinach
1/2 pint or 8 ounces of rasberries washed
2-3 ounces of creamy goat cheese about half a small package
1/2 cup of marcona almonds or any almonds you like

Method

1. Lay a bed of spinach in your serving bowel.
2. Pour out the raspberries on top.
3. Crumble the goat cheese in your fingers until you have small nubs to dollop on to the rasberries.
4. Decant your almonds into the middle of the salad
5. Serve and enjoy. This went very well with a light Sauvignon blanc

As always, much love, many blessings, and happy late summer

Tuesday, September 7, 2010

Turkish Shepherd's Salad


When I am having a bad day, I work in my garden, especially now in tomato season. If I am having a terrible day, I go to the local ethinic market and I find an ingreident that I have never used before. I greedily purchase my treasure, and google the recipes I can use the ingredient in. Truth be told, I have had some sad days lately. In attempt to cheer myself up, I bought Sumac. Partially, because I have never used it before, which is odd, seeing that I am Egyptian and it is a common middle eastern spice. Partially, because I had faintly recollected that it was poisonous...

After some research I have found out that it is not exactly poison. My delusions of granduer picturing me pitted and dueling with death have ended. Although I did eat torofugu (posionous blowfish) and drink habu saki (saki with the venom of a habu snake) when I lived in Japan. I am also fond of Virgina Nettle soup, which is also poisonous until after you cook it.

Sumac is the dried fruit ground into powder of a Rhus plant. The fruit actually looks a little bit like grapes. Which makes sense, because when I had this at an Afghanistan restaurant the owner said it was grapes. The taste is lemony and a little bitter adding a pleasant brightness to meats and salads. In most middle eastern cuisine it is a meat seasoning for kebabs or shwarma. However, in Turkey they use it on veggies. Most commonly you will find the spice mixed into a blend called Za'atar which is ubiquoutous to middle eastern cuisine. Everything has za'atar on it, pita, meats, veggies, hummus, furniture, small children, pets, you name it. It is a warm and wonderful spice blend, but that is for another post.

So here goes an easy and delicious salad with my star ingredient Sumac.


Ingredients:

4 heirloom or any kind of tomatoes washed and diced
1 small shallot, thinly sliced
2 cloves of minced garlic
1 freshly squeezed lemons
1 teaspoon dill
1 teaspoon oregano
1 teaspoon sumac
1/2 teaspoon cumin
1/4 cup extra virgin olive oil
salt
1/3 cup cilantro
1/3 cup parsley

Method:

1. Dice the tomatoes, and slice the shallot. Place artfully on a plate.
2. In seperate bowl make the dressing by mincing the garlic, juice the lemon, add all fo the spices and slowly drizzling in the olive oil while you whisk.
3. Pour the dressing over the tomatoes and shallots.
4. Tear the herbs and arrange on the plate.

I served mine as part of a middle eastern dinner, but this is wonderful as a side dish to anything. Many of the ingredients are common in Latin, Indian, and Asain cuisines so you could match this side dish with anything.

As always, much love, many blessings, and happy chopping...

Monday, September 6, 2010

Red Fruit Festival Recipe Entry: Savory Sundried Tomato Goat Cheesecake


Suffice it to say, I am tickled heirloom tomato pink to do my first recipe contest. My good friend Maggie is a recipe contest and twitter queen and I hitched my wagon along for the ride. We made a savory sundried tomato goat cheesecake with a basil and parmesan crust. We topped the cheesecake with a tomato water and juice gelee, basil, and tomato paper (made from crisped tomato skins.) We plated the cheesecake with a Carpaccio of heirloom tomatoes and coulis made from tomato pulp. It wasn’t a simple recipe but it sure is delicious and lots of fun to make.

Mid-Atlantic’s top chefs, restaurants, farmers, community gardeners and local growers are celebrating Local Tomatoes with a stellar food and wine pairing on Friday, September 24th at the Ronald Reagan International Trade Center. We will certainly keep you posted on how it goes.


SAVORY SUNDRIED TOMATO GOAT CHEESECAKE WITH BASIL AND PARMESAN CRUST

FOR THE CRUST

INGREDIENTS:
1 cup of fresh bread crumbs
2 Tablespoons of butter
½ cup of grated parmesan
¼ cup of fresh basil leaves
Dash of salt and pepper
Olive Oil Spray

METHOD:
1. Preheat the oven to 350 F
2. In a food processor blitz together all of the ingredients except for the spray, the order doesn’t matter. Pulse until all the ingredients are incorporated and the breadcrumbs look like wet sand
3. Use the olive oil spray to grease an 8-inch spring form pan
4. Pour crust mixture into the pan and push down with the bottom of a glass to make a uniform crust along the bottom and edges
5. Bake for 10 minutes and let cool on a baking rack. Keep the oven on for the cheesecake to bake at the same temp in about 5 minutes

CHEESECAKE FILLING

INGREDIENTS:
11 ounces of fresh soft goat cheese
8 ounces of organic cream cheese
3 large organic eggs
½ cup of organic heavy cream
¼ cup of fresh basil
¼ cup of fresh parsley
¼ cup of sundried tomatoes packed in olive oil
Dash of salt and pepper

METHOD:
1. Put a large pot of water on the heat to boil.
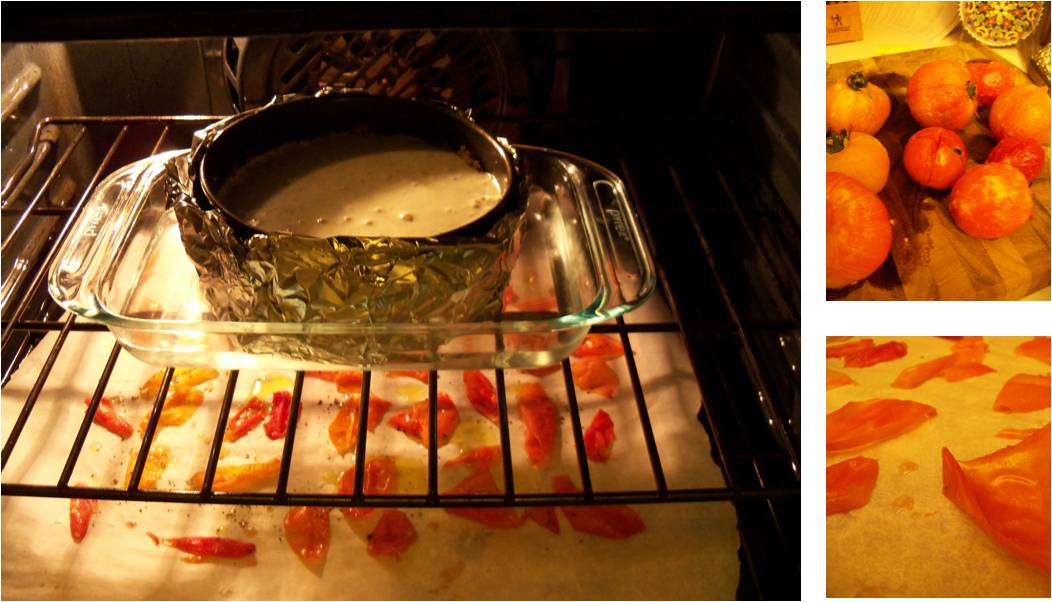
2. Cover the outside of the baking pan with three layers of foil. This will prevent any of the water from the ban marie spoiling your cake
3. Blitz in a food processor all of the ingredients until they make a creamy almost lightly golden smooth batter
4. Fill the cooled crust with the batter
5. Create a ban marie by making a bath for the foil wrapped cake pan. In a large roasting pan, pour the hot water until it is about an inch and half deep. Carefully place the foil wrapped pan with the cheesecake filling into the roasting pan. You want the water to come up about half way up the outside of the cake pan
6. Carefully place in the oven and bake at 350 for 50 minutes to an hour
7. Every oven is different so check. You want the outside of the cake to be set and pull away from the sides of the cake pan. The top will have a few slight kisses of brown, and the middle of the cake should still jiggle a bit. If you use a cooking thermometer the middle of the cake should register at about 150 F
8. Let the cake cool slowly within the ban marie. This will prevent cracking
9. When cool, cover with plastic cling wrap and set in the fridge for up to two (2) days


TOMATO PAPER (CRISPY TOMATO SKINS)

INGREDIENTS:
Large pot of boiling water
8 to 10 large/medium sized fresh tomatoes
Olive oil
Salt and pepper

METHOD:
1. Set the large pot of boiling water on medium high heat to keep a rolling boil
2. Make two small incisions the shape of cross on the bottom of each tomato
3. Blanch the tomatoes in the boiling water for a minute or two until you can start to see the skins loosen
4. Carefully remove the tomato skins by starting at the bottom and peeling upward. They will come off in strips. If you are gentle you will have four good size peels of tomato skin for each tomato. But don’t stress it, little one or big ones work just fine
5. Lay the tomato skins on a parchment lined baking sheet
6. Drizzle with olive oil
7. Sprinkle lightly with salt and pepper
8. Lay the baking sheet and the skins in the oven underneath your cheesecake at the same oven temp 350 F
9. Bake for 8-10 minutes, until the skins look crispy
10. Cool on a wire rack so that bottom of the skins can crisp as well
Note: These will keep crispy for 3 days in a air tight container. You can use them whole or grind them up and they add a lovely intensely tomato flavor to soups, sandwiches. I use them as a garnish on gazpacho or in sandwiches

TOMATO WATER AND PULP

INGREDIENTS:
8 to 10 skinless tomatoes
½ teaspoon of salt

METHOD:
1. Core the tomatoes and remove the stem
2. Cut into quarters
3. Puree in a food processor
4. Lay a colander in a large bowl, and lined with a few layers of clean cheesecloth
5. Carefully pour the tomato puree into the cheesecloth bowl and sprinkle with half a teaspoon of salt.
6. Cover with plastic cling wrap
8. Let sit over night
9. In the bottom of the bowl will be the tomato water in the cheesecloth will be the pulp.


TOMATO WATER AND JUICE GELEE

INGREDIENTS:
1 cup of tomato water
1 cup of tomato juice
2 packages of unflavored gelatin

METHOD:
1. In a small sauce pan heat the tomato juice until it is almost boiling
2. Add the gelatin to the cold tomato water and stir
3. When the tomato water thick and the gelatin soft add to the hot tomato juice off the heat.
4. Pour into a container and place covered in the fridge for a few hours to set. (I just left it in the fridge while I went to work.)

TOMATO COULIS

INGREDIENTS:
Tomato pulp from tomato puree after strained overnight
Dash of white pepper to taste

METHOD:
1. Using a wooden spoon and fine mesh colander push the pulp through into a bowl
2. In the end you should have a thick but smooth pinkish sauce of tomato and in the colander the seeds. It takes a while, keep pushing it through
3. Taste and add white pepper if needed


TO SERVE
1. Run your knife along the edge of the spring form pan
2. Spoon and spread the tomato gelee on top of the cake
3. Remove the sides of the pan by popping it open and carefully lifting the spring form off the cake
4. Create a circle of basil leaves in the center of the cake.
5. Create tomato paper fleurette by arranging the tomato paper like petals in the middle of the basil

TO PLATE
1. Carefully cut a slice of the cake and slide your serving knife underneath the crust to lift
2. Arrange some tomato paper and basil on top of the cake
3. Using a squirt bottle add some of the coulis to the side of the cake
4. Thinly slice some beautiful heirloom tomatoes to create a Carpaccio alongside the cake
5. The tomatoes should be sweet enough after the hot summer sun, but if not feel free to garnish with a little agave syrup and some flake sea salt over the Carpaccio
6. Serve with a cold glass of Vino Verde and good friends


THANK YOU FOR ALLOWING US TO SUBMIT OUR RECIPE. IT WAS LOTS OF FUN TO MAKE AND WE HAD LOTS OF FUN EATING.

As always, much love, many blessings, and happy tomato-ing

Tuesday, August 31, 2010

Caprise Salad


There is something so satisfying about growing and eating your own food. And tomatoes like all berries are absolutely spectacular when they are in season and horrifying when they are out. I have been working on a tomato recipe with my good friend Maggie, that has a tomato water gelee, tomato paper, tomato consume and while all that is wonderful. I feared a great injustice would be done if I didn't take the time pay homage to a simply prepared exquisite dish. A friend of mine was in Italy and asked what was in the tomato salad. The Italian waiter replied, "Tomatoes." It is good enough for the Italians and it is more than good enough for me.

Tomatoes ripened in the August sun need nothing to be delicious, but they become sublime when kissed with sea salt, gently anointed with Sicilian olive oil, and blanketed with basil and mozzarella. When making such a simple dish, with so few ingredients the quality becomes paramount. Now, I could just say the best you can find, but allow me a small tangent about a few things.

A good homegrown or farmers market tomato, sliced gently is key. Some flake sea salt, I like Maldon the best. Their product is consistent and perfect. It melts beautifully when hot or it provides just a little extra crunch with perfect clean sea-like flavor. Good mozzarella, freshly procured, still in it bathing liquor. I like the bocconchinis, possibly because of the name (it means little mouthful) and partially because that was my nickname once upon a time. But choose any you like as long as it is good and fresh. There is a place in Arthur Avenue called Casa Mozzarella in the Bronx, NYC. It is my true confession that I have waited in line in freezing cold two days before Christmas to get a few pounds of super fresh still warm mozzarella. Basil freshly picked, just buy the little plant, leave it in your kitchen, you won't regret it. If you feel adventurous, few grinds of pepper and a couple of drops of balsamic vinegar add more depth of flavor.


Ingredients

Tomato
Soft Mozzarella Cheese
Basil
Sea Salt
Olive Oil
Pepper and Balsamico (optional)

Method

1. Slice the tomato and cheese
2. Create a beautiful display either overlapping neatly or jumbling the ingredients in a wonderful delicious pile
3. Sprinkle with sea salt and lightly pour around some oil
4. Enjoy greedily or share with someone you truly, truly, truly, love, or simply enjoy greedily, alone giggling with pleasure

As always, much love, many blessings, and happy summer!

Friday, August 27, 2010

Peach Cupcake with Almondine Frosting


In Virginia in August peach is king. And here again I publish a recipe for a darling little cupcake that incorporates cousins and delicious seasonal fruit. Peaches and almonds are actually relatives both from the same genus Prunus. Peaches full name Prunus persica and almonds are properly addressed as Prunus dulcis. In this small little family re-union I took to basic recipes one for a vanilla cupcake and one for vanilla frostings and gussed them up a bit with a peach and ½ a teaspoon of almond extract. Be careful, almond extract is so desperately strong, a little go a very, very long way.

Peach Cupcake

Ingredients
1 stick of butter melted
¾ cups of self rising flour
7 tablespoons of sugar
2 large eggs
A splash of vanilla
A splash of milk
A super ripe peach, sliced and pitted

Method

1. Preheat your oven to 400 degrees.
2. Melt the butter in a bowl in the microwave or any way you find it easiest.
3. In a food processor add all the ingredients.
4. Fill a muffin tin with liners and half full with the batter
5. Bake for 20 minutes
6. Let cool on a wire rack


Almondine Frosting

Ingredients

1 stick of softened butter
2 cups of icing sugar
½ teaspoon of vanilla extract
A splash of cream or milk

Method:

1. Add all the ingredients into the bowl of your mixer, whip the icing until it is creamy and spreadable.
2. Ice your cupcakes as desired. Here I used a pastry bag and a star tip.

As always, many blessings, much love, and happy baking!

Monday, August 23, 2010

Peach turnovers


The farmers markets in Virginia are brimming with peaches, white, yellow, free-stone, cling- stone. All delicious, filling the air with their sweet perfume, juicy, a lovely shade of coral pink with the slightest blush of red. If you go to the farmers market and you know you are going to bake with them, ask the seller if they have “ugly peaches.” These are the peaches that misshapen or slightly over ripe. They taste just as delicious sometimes more so, and you can purchase them for a fraction of the price as you would in the grocery store.

Now during peak season there is no need to cook these delicious fruits. This morning I had a white peach, with prosciutto, olive oil, salt and pepper for breakfast. But for those of you who prefer a pastry breakfast, I decided whip up this easy little number. With a little bit of ice cream or whipped cream it would be a lovely dessert. But it is delicious with coffee. I prefer home-made turnovers because the dough is moister, more buttery. The hands on time are about 10 minutes, it bakes for 20 minutes and it makes 12 of them. You can use either flour or cornstarch as a thickner for the filling. Using fresh peaches will make a very wet filling if you do not use a thickner. I have a relative that is allergic to corn so for her I would use flour. But do as you like, it is your kitchen.

Ingredients

1 large ripe peach
1 tablespoon of vanilla sugar
1 tablespoon of flour or corn starch
1 egg for egg wash
1 package of puff pastry or two 12X8 sections of homemade pate brisee

Method

1. Preheat the oven 400 degrees
2. Prepare two baking sheets with parchment paper
3. Rinse and dice your peach
4. Stir together the diced peach, sugar, and flour/cornstarch
5. Un-roll or roll out your dough so that it is about a ¼ of an inch in thickness
6. Cut into twelve even squares. Don’t get out your ruler, but they should be about the same size so that they will cook evenly
7. Dollop about a 2 teaspoons of the filling into each square
8. Brush each edge with egg wash and fold over. Seal the edges with a fork so that you can greedly ensure that all the delicious filling stays in the pastry. Poke a few holes in the top to let the steam escape
9. Bake for 20 minutes
10. Enjoy hot and fresh from the oven

10 steps, 10 minutes, delicious dozen of peach turnovers, perfect for company or a brunch. Who am I kidding, I made these for breakfast for no reason. But if I did have company over, I am sure they would really enjoy them.

As always, much love, many blessings, and happy baking… and going to the market!

Monday, August 16, 2010

Creamy Chicken (mock) Risotto and White Truffle Oil


Everyone loves the creamy heart-warming taste of risotto, and normally I love staring into a pot of steam slowly mixing in hot broth, mindlessly stirring for 20 minutes. I find it a sort of culinary meditation, and in this Zen state I forget about the day and the stresses that came with it. I can instead focus on the simple things in life that bring joy. However, sometimes, you don’t have the time, patience, or inclination to make risotto. For those days I offer my mock-risotto trick.

I use a rice cooker to cook regular plain old rice, then I make a low-fat big-taste cream sauce, add the flavors, voila creamy risotto in no time.

Ingredients

2 cups of rice
3 cups of water
2 Tablespoons of butter
2 Tablespoons of flour
1 cup of milk any kind (I had skim, so I used skim)
About a cup of leftover chicken chunks
About ½ a cup of parmesan cheese
A pinch of cayenne (about a 1/8 of a teaspoon)
A grating of nutmeg (about a ¼ of a teaspoon)
Salt and pepper to taste
¼ cup of white truffle oil or another flavored oil
Chives, parsley, or basil to garnish.

Method

1. In your rice cooker or pot of choice cook rice as you normally would adding the rice and the water, pressing the on button. It cooks it to perfection everytime.

2. In a heavy bottom sauce pan over medium heat melt the butter and then add the
flour to become a heavy paste. Cook for a minute or two until the raw flour taste cooks off but it is not burned.

3. Add the milk and whisk for about a minute and allow the mixture to happily bubble and become thicker over the stove. Stir occasionally, when the mixture is thick about 3 minutes, add the rest of the ingredients and turn the burner off. Allow the sauce and ingredients to stay warm by covering with the pot lid or some foil. It is ok if it cools off a bit you will be adding hot rice at the end.

4. When the rice is cooked add the rice to the sauce and chicken mixture.

5. Plate by mounding the creamy delicious base on to each plate. Generously dust with more parmesan, any fresh herbs you have on hand creating a beautiful white mountain. Anoint the mont blanc with a small amount of white truffle oil, about 2 Tablespoons per person.

Enjoy with a happy heart and warm tummy.

As always, much love, many blessings, and happy cooking.

Thursday, July 1, 2010

The Cuban Cure


Regardless of why you are sad, sick, or otherwise less inclined to tolerate anyone on the planet, the Cuban Cure in my family is the end all be all in culinary medicine. My mother is Spanish, so I grew up with this cure. It is the ultimate in comfort food. The trick is the sofrito. Sofrito is the Spanish version of mirepoix. It is mixture of onions, peppers, garlic, and spices that flavor nearly every Spanish dish, and it is the sweetest aroma in the kitchen. It just smells like home. The other big trick to mash down about 1/3 of the beans until it is a lovely black purple paste which thickens the dish. My grandmother used to do this with a mallet. Which still makes me smile, but I now do it with a potato masher. So here it is, my silver bullet for all that ails you.


Frijoles Negros (Black Beans and Rice aka the Cuban Cure)


Ingredients


3 cans of organic black beans

2 large red bell peppers

2 large onions

olive oil for the pan


a good palm full or 2 Tablespoons of each: Pimenton de la Vera (smoked paprika), Cumin, Salt

a good pink or 1 teaspoon of each: Black Pepper, Coriander, and Cayenne

4 cloves of grated or minced garlic

1 1/2 c. sherry

cooked rice


Method


1. I admit, I cheat I use canned beans, organic here does make a difference. Chef's say there is a difference I think organic canned beans taste just fine.

2. Making the Sofrito. In a large pot of over medium high heat saute the diced onions and peppers until they are translucent and starting to sweat (i.e. you can smell them.) Add all of the spices, keep them around, you might need more when it is done cooking. Let them toast a bit until fragrant. Add the garlic and stir. Add the sherry and swirl about until a bit has cooked out and you can no longer taste the alcohol.

3. The paste: Add about a third of the beans to the sofrito and spices. Cook for a few minutes until the pot comes to a boil. Using a potato masher or a hammer if you are inclined mash down to a lovely purple black pulp.

4. The delish: Add the rest of the beans and allow the sauce to reduce, about 10 minutes or so.

5. The serve: over rice with fresh cilantro and some salsa, with chicken, with anything, I would eat this on cardboard.


As always, many blessings, much love, and happy cooking.

Tuesday, June 15, 2010

Vietnamese Carmelized Chicken, Pickled Carrots and Coconut Rice

Vietnamese cuisine sounds intimidating, I know. But please believe it is the farthest thing from difficult. Most recipes are delicious, light, healthy, and absolutely elegant. Understandably so, it is an Asian country, in a hot climate with a strong french influence.

My sweet chicken sautee with coconut rice and fresh veggies is a wonderful summer meal. You and your family are only 30 minutes from a gourmet meal from Nam Viet. I find it easiest to make the carrots, then the rice and then the chicken. Mostly because the carrots pickle to perfection, the rice bubbles away, all the while you leisurely mix some chicken in a hot pan.
Now, if you don't have fish sauce use half soy and half worchestire sauce. If you don't have Thai basil, use regular. The most important part is that the chicken carmelizes. I realize that not all cooks are greedily drawn to the market grabbing anything new and exciting. I realize that I am strange and find my pantry and place of solace and beauty. But, it is the qualities that makes us friendly and the quirks that make us lovely.
30-minute Easy Pickled Carrots
Ingredients
3 carrots julienned or match sticked
1 cup of white vinegar
½ cup of white sugar
Method
Mix all ingredients in a bowl. Let sit for 30 minutes. Drain to serve. Delish…
Coconut Rice
Ingredients
1 cup of rice
2 cups of coconut milk (1 16oz can)
Method
Combine ingredients in rice cooker. Push button on. Oh how I love technology. Fluff with fork when ready to serve.

Lemongrass Chicken

Ingredients

2 tablespoons fish sauce
3 garlic cloves, crushed
1 tablespoon fresh grated ginger
1/2 teaspoon salt
2 tablespoons plus 1 1/2 teaspoons sugar
1 1/2 pounds boneless, skinless chicken thighs
3 tablespoons cooking oil
2 fresh lemongrass stalks, tender inner white bulbs only, minced1 large shallot, thinly sliced
Chopped veggies, cilantro, Thai basil and peanuts for garnishing

Method:

1. In a small bowl, combine the fish sauce, garlic, ginger, salt, and sugar.

2.Slice the shallots into thin half moons and add the minced lemongrass. Cook in a hot wok with oil until the shallots are tender and the lemongrass is fragrant. Add the chicken and sautee until cooked through but still tender.

3. Add the sauce to the hot wok and coat chicken. Cook this delicious concoction until the ginger and garlic are fragrant. Turn the heat off add some of the Thai basil and cilantro and deeply inhale.

4. Serve over rice noodles, coconut rice, with chopped veg and peanuts. I love to make pickled carrots (see below) and add slices of cucumber, chopped green onions, and chopped peanuts. All under a heaping mound of cilantro and Thai basil.

As always, happy cooking, much love, and many blessings.

Friday, May 21, 2010

Summer Peach Icecreaming


Ahh summer... sweet creamy summer. I love peach ice cream it has an innocent quality about it. Somehow, this cream colored icey confection takes you to childhood. It reminds me of summers on the southern Florida canals, little canoes, and bike rides through the park.

Unfortunately, this does require an ice-cream maker. However, I am sure that one could pour it into a dish to hard and then just blitz in a food prep to create that creamy consistency.

Ingredients:

3/4 cup of half and half
1/2 cup sugar
3 egg yolks
3/4 cup of heavy cream
1 can of drained peaches and mushed to pulp

Method:

1. In a heavy bottomed saucepan heat gently the half and half with the sugar. Turn off the heat once the sugar has dissovled.
2. Seperate your eggs in a bowl. Reserve your whites for meringue or a healthy omlette. Whisk the yolks together.

3. Temper the yolks by adding a little bit of the warm half and half. You don't want to the eggs to cook. Add the warmed egg yolk mixture.

4. Add the heavy cream and stir until combined.

5. Chill in the refridge until cold, at least 30 minutes.

6. Add to the ice cream maker and let spin until the icy mixture starts to seem to be the consistency of thick milkshake. This is delicious already so by all means indulge if needed.

7. Pulp the peaches to a thick paste with little bits. I am always amazed at how disturbingly satisfying this is. Add the golden paste to the ice cream maker.

8. Store in airtight container in the freezer to firm up. However, you will probably succumb to temptation, but I cannot blame you.

9. Enjoy!

As always, much love, many blessings, happy ice-creaming, and happy summer!

Friday, May 14, 2010

Dark Chocolate Ganache Topped Vanilla Cupcakes

I love cupcakes. I will admit, I am on the verge of obsession. Truthfully, it is the flexibility and freedom you find with these mini cakes. They are so easy to bake and only take 20 minutes, but most importantly you can put anything in them, top them with anything, and everyone loves them. I am quite certain even the most evil of individuals would warm up to large tray of these lovely sweet bites.

Today I decided that a lovely dark chocolate heavy cream ganache was in order.

To make the cupcake I use a food prep, but a mixer, a bowl and wooden spoon, nearly anything with a mixing capacity will do.

Cupcake

Ingredients

1/2 cup or 1 stick of melted butter
3/4 cup of self rising flour
1/4 cup of sugar
2 eggs
slosh of vanilla extract (a teaspoon) please use excellent quality all natural real vanilla extract
big slosh of milk (two tablespoons)

Method

1. Set the oven to 400 degrees, and line a cup cake tin with liners
2. Melt the butter in the microwave
3. Place all of the ingredients save the butter into a mixing vessel
4. Mix, blitz, or whirl
5. Add the butter and mix-in
6. Spoon into lined tins and bake for 20 minutes or until brown and toothpick comes out clean

Ganache

1/2 cup of choco buttons
2 tablespoons of double cream

Method

1. In a bowl add the chocolate and cream
2. Melt in the microwave together at 30 second intervals
3. Stir quickly between each melting session. Calmly and quickly stir the chocolate. The chocolate may seize (harden up and seem grainy) continue to melt and stir, it will come around.

Spoon on your ganache crowning your vanilla cupcakes. Bejewel with your adornment of choice, I love sugar pansies, but M&Ms, and anything else will be just lovely. Or leave them be in all of their chocolately gloriousness.

Voila, enjoy.

As always, many blessings, much love, and happy baking.

Monday, May 10, 2010

Strawberry and Rhubarb Cream Pie


I have been waiting impatiently for the local farmers market to color and smell explode with gorgeous fruits and vegs. And now that it has, I am truly reveling it. Now in Virginia sweet, very red, strawberries are only here for May and June. To celebrate I whipped together this all together joyously easy pie, and it is cinch to entertain with. If you can't find rhubarb do with out and add a little lime juice to cut through the creamy sweetness.

Ingredients

One pre-baked pie shell any kind is fine
1/4 pound of rhubarb (small stems are so much easiers)
3 tablespoon of strawberry jam
1 eight ounce package of cream cheese
1/4 cup of sugar
a squich of half a lime for juice
25 or so stemmed strawberries
1 tablespoon of apple or apricot jelly to glaze

Method

1. Set a heavy bottomed saucepan on the burner. Chop up the rhubarb into very small little chucks. I would call it a dice if I had better knife skills, but truly, it is only baby little chunks. Set on medium high heat with the strawberry jam and rhubarb. Cook until the rhubarb is soft and the liquid is absorbed.

2. In a standing mixer whip together cream, cooked rhubarb, sugar, and lime juice. Until it is light and fluffy. Fill the pie shell with this yummy creamy concotion.

3. Set the stemmed strawberries point side up on the cream filled pie.

4. Melt the apple jelly in the microwave and brush the shiny warm liquid on the strawberries. Making them glisten in the sugary goodness.

5. Set in the fridge to chill, slice, and enjoy.

Ok, so this less than cooking, and less than baking, more like assembling. But it is delicious regardless of the run-away treatment.
As always, happy baking, much love, and many blessings.

Thursday, February 25, 2010

Spiced Carrot Cake


I adore carrot cake. There is something unabashedly irreverent about the legitmacy of a vegetable placed in a indulgent spiced cake deluged in whiped creamcheese frosting. It is a perfect contradiction in terms. This is actually a very simple and fast carrot cake. I do not mess about with raisins or pecans, but if you wish you can add a cup of both or none. Since I bake for my office, I usually don't include nuts for fear of allergies. But I believe, in the kitchen especially, you should cook to please those you love and yourself. And by all means, please convince yourself that carrot cake is actually good for you.

Ingredients

Carrot Cake

2 ½ cups all purpose flour
1 ¼ teaspoons baking powder
1 teaspoon baking soda
1 ¼ teaspoon ground cinnamon
½ teaspoon ground black pepper (I love this addition)
1 tablespoon ground cardamom
¼ teaspoon ground cloves
¼ teaspoon ground allspice
good scraping of nutmeg
½ teaspoon free-flowing table salt
6 carrots, peeled
1 ½ cups sugar-bowl sugar
½ cup brown sugar packed
4 large eggs
1 ½ cups canola oil (nearly any oil will do, except olive)
Cream Cheese Frosting
Vanilla bean seeds, scraped from 1 vanilla pod
1 package of cream cheese, softened
5 tablespoons unsalted butter softened,
1 tablespoon sour cream
½ teaspoon vanilla extract
1 ¼ cups icing sugar
Method
  1. Preheat the oven to 350 F
  2. In a bowl stir together all the dry ingredients including the spices. Whisk together rather than sift, it is much faster.
  3. In a food prep shred the carrots. Set aside the gorgeous orange chaos of carrots.
  4. In the processor whip together the sugars and eggs until creamy and bothered. Drizzle in the oil through while the prep is running through the tube.
  5. Stir together all of the ingredients, food preped egg mixture, the dry goods, and the carrot shreds.
  6. Pour into prepared muffin cups and bake for about 22 mins.
  7. In the mean time, whip together using your food prep or standing mixer all of the ingredients for the cream cheese frosting.
  8. Cool cupcakes on a wire rack.
  9. When cooled decorate to please. I just adore those cute miniature fondant carrots. It is as if a small cartoon bunny will jump up to steal them. There is never too much kitch in the kitchen.

Here is to hoping for an early spring.

As always, much love, many blessings, and happy baking.

Stuffed Peppers


Anything stuffed in Arabic is called mashi, and Egyptians, they will stuff anything, grape leaves, tomatoes, zucchinis, they'll stuff you if you stand still long enough. But, I digress. My favorite mashi is stuffed peppers. For the most part it is usually vegetable stuffed with a rice, meat, tomato sauce mixture. For this rendition, I made a vegetarian, Greek stuffing with Israeli cous cous, chick peas, olives, feta, and fresh herbs.
I took my inspiration for the Mediterranean.
Ingredients
2 cups Israeli cous cous
1 cup chicken stock
3 Tablespoon of chopped Kalamata olives
4 oz of chopped feta
2 Tablespoons of fresh parsely
2 Tablespoons of fresh basil
1 teaspoon of fresh mint
3 Tablespoons olive oil
1 Tablespoon of cumin
1 teaspoon of Pimenton (smoked paprika)
a pinch of cayenne
1 teaspoon of dried oregano
2 cloves of garlic minced
1 can chick peas, drained
4 cored red peppers
Method:
Preheat your oven to 400 F.
1. Cook the cous cous by heating the chicken stock in the microwave to a near boil. Out of the microwave add the cous cous, cover with plastic wrap and let sit for five minutes.
2. Stir together the olives, feta, and fresh herbs.
3. Heat the olive oil in a pan, add all of the dried herbs and the garlic, stir until fragrant. Add the chickpeas and just allow the chickpeas to sautee and really soak up the delicious flavors of the herbs and garlic.
4. Mix all the ingredients together, cooked cous cous, herb/feta mixture, fragrant chickpeas.
5. Fill the peppers with the stuffing. Place in a shallow dish and cook for 20 minutes at 400 F.
6. Garnish with fruity extra virgin olive oil, balsamic vinegar, and some more fresh herbs.
Enjoy...
Much love, many blessings, and happy stuffing!

Saturday, February 6, 2010

Poulet Basque


Literally, Poulet Basque translates to Basque Chicken, but more figuratively it translates to succulent buttery chicken, golden pepper ragout, and heavenly spiced rice. My mother bought me my latest recipe book, "1001 foods to die for" and while the inspiration came from this lovely volume. The recipe is inherently an Egyptian and Spanish fusion, a science experiment gone beautifully and deliciously wrong.


For the Chicken


6 Skin-on boneless chicken thighs

Pimenton (Smoked Paprika)

Salt

Pepper


Heat up a large skillet with two tablespoons of vegetable oil until it shimmers. Generously clothe the chicken on both sides with your pimenton, salt, and pepper cloak. Sear the chicken on both sides to reach a reddish burnish. Set asside.


For the Ragout


1 Large Onion

Thyme

Salt

Pepper

1 Large Red Pepper

1 Large Yellow Pepper

1 Large Tomato


Place all of the diced ingredients into a large bowl. Place in a large skillet and place the almost cooked chicken thighs on the bed of vegetables. Heat your oven to 400 degrees F. And cook your chicken until an internal temperature reaches 180 degree F, or until the juices run clear about 30 mins.


For the Rice


While the chicken is cooking prepare the rice in a rice cooker.


3 cups of chicken broth

1 and half cups of white rice

10 threads saffron

Pinch of Pimenton

Pinch of Cayenne Pepper

Pinch of Cinnamon

1 bay leaf


Place all the ingredients in your rice cooker and set.


Once the rice and chicken is cooked through serve with an excellent Spanish Wine like Temparillo and enjoy.


As always, much love, many blessings, and happy cooking.

Truffled Tallegio Flatbread


I have stumbled across the most elegant party appetizer or winters lunch. It is decadent but inexpensive, it is luxrious, but easy. Really, it is having your elegant cocktail party and enjoying it too. Besides the rise time (which is about an hour and a quarter), it comes together in about 10 minutes, and bakes in 15. What could be better.


Ingredients


1 1/2 cup of warm water

1 Tablespoon of yeast (or packet)

1 sugar cube

4 cups of all-purpose flour

1/2 cup of olive oil

1/2 cup of grated parmesan

1 teaspoon of grey sea salt

2 teaspoons of chopped rosemary

1/4 cup of olive oil

6 oz ounces of Tallegio cheese torn into bite-sized morsels


To Garnish:

12 slices of black truffles out of a jar

1/2 teaspoon of fleur de mer (fine-grade sea salt)


Method:

1. In a large measuring cup, doll out the water, add the yeast and sugar cube allow to sit until poofy.

2. In your food processor: pulse the salt, rosemary, and paremesan until is ground into a sandy powder.

3. Add the flour and pulse.

4. With the prep blizzing, add the oil and water/yeast mixture through the feed tube and allow to spin until the ball of dough is just formed. Add more flour if necessary for the dough to pull away from the sides of the prep bowl. For this I used what ever is handy which happened to be whole wheat flour, but you can use all-purpose or any other kind.

5. Flour your conter top and knead until you have vented all frustration, it is a wet dough and can be neglected, so do not over tax yourself.

6. Set in an oiled bowl with a tea towel perched over top for about an hour.

7. Divide dough into two equal peices and spread to 1/2 inch thick on to its own baking sheet covered in parchement paper.

8. Cover each piece of dough and the cookie sheet with a tea towel and allow to rest for another quarter hour (15 mins).

9. Pre-heat your oven to 450 degrees F.

10. Using your fingers dot the bread with your fingers to make pillowy indentations into the dough.

11. Brush with olive oil, sprinkle sea salt, and dollop out bit-sized morsels of Tallegio cheese.

12. Bake for about 10 to 12 minutes until the cheese is melted and the bread is brown.


Prego Mange!

Come sempre, molto amore, tante benedizioni, e felice cottura.

Homemade Ricotta


For years, I have been intimidated by making cheese. All-the-while feeling as if those "oh it is so easy" sucessful cheese-makers were mocking me. Mocking me and my lack of ability to let milk spoil. I mean for pete's sake, it is just letting it go rancid, how hard can it be. 19 year-old hormone driven drunken fratboys have more sucess making cheese than I did. Yogurt, sure. Butter, no problem. Cheese, not so much. Suffice it to say that my last attempt to make ricotta included cheese cloth acrobatics as it hung over my sink from my cabinent leaking putrid smelling whey for way too long.
So... this time, I chucked the directions and found a much more civilized approach, so that humans and in-process cheese can co-exist. This recipe makes 2 to 3 cups creamy delicious ricotta with no more effort than warming milk, stirring in vinegar and salt, and letting sit and seperate gently in my fridge overnight.
Ingredients

2 quarts of whole milk
1 cup of heavy cream
2 Tablespoons of white vinegar
1/2 a teaspoon of kosher salt

Equipment

1 large saucepan
thermometer
cheesecloth
collander
large bowl

Method

1. Heat the milk and cream until it reaches 180 degrees F.
2. Take off the heat and stir in the vinegar, and stir for 30 seconds.
3. Stir in the salt, and stir for another seconds.
4. Set a folded quartered cheesecloth in a colander and set in a large bowl.
5. Gently pour the milk into the cheesecloth lined colander/bowl.
6. Set in the fridge over night and allow the whey gently to drip out.
7. The next morning awake to creamy delicious ricotta... which is delicious for breakfast with orange zest or cocoa powder.

Molto delicioso!

As always, much love, many blessings, and happy cheese making!


Wednesday, January 20, 2010

Sweet potato gnoochi with chestnuts and sage brown butter sauce


I admit, unapologetically, I am hopelessly addicted to cookbooks, cooking magazines, and cooking shows, etc. Well, I am. I feel the need to stand up in a support group and state my name. Nonetheless, my family must enjoy how easy it is to buy me presents… However, my dark confession is that, while I love reading recipes I very rarely follow them. Instead I merely take inspiration and retrieve a rough outline of requirements prior to my kitchen adventures. The following is one such adventure.

While the outcome was delicious, it did make an extreme amount of gnoochi. If there is sweet potato shortage, it is my fault. So for your and my benefit, the following recipe I adapted from myself. So rather than being able to serve a family of 18, this recipe will serve a family of 4.

Ingredients

2 steamed sweet potatoes
2 cup of flour
1 egg
Good scratch of nutmeg

Method

1. In your preferred mixing container or appliance combine all of the ingredients adding more flour until you have reached a doughy but not sticky consistency.
2. Roll the dough into a ball and divide equally into for pieces.
3. Then, as if you were playing with play-dough, make logs and cut into bite size pieces.
4. Roll those bite sizes pieces on the back side of a fork dipped in flour to create the tiny ridges.
5. Boil a large amount of salted water and gently ease the gnocchi dumplings into their hot-tub. When they float, they are done. Remove with a slotted spoon.

Serving

I choose to fry my gnoochi after they are cooked in browned butter until the edges are crispy and browned. For this rendition I also added sage and sliced chestnuts to the butter to create the sauce. Simply shave fresh parmesan for a jaw-dropping, mind blowing, absolutely delicious meal.
As always, much love, many blessings, and happy gnocchi rolling…

Orangezest Cakettes


Orange you happy to see me?

Sometimes in the morning you crave something sweet, with immediate gratification and no effort. This is one such treat. One cuisine art food-prep, a few ingredients, and inside of 20 minutes a moist delicious golden morsel that is a three-bite cakette with a kiss of orange.

The recipe is adapted from Nigella Lawson’s Domestic Goddess Fairy Cake recipe. And while being coy about the title, I believe truly that a woman can indeed be a goddess especially with the magic of eggs, flour, sugar, and butter.

Ingredients

¾ cup of flour
1 teaspoon of baking powder
7 tablespoons of sugar
2 eggs
3 tablespoons of milk
Zest of one orange
Good sploosh of vanilla (1 teaspoon at least)
½ cup of melted butter

Preheat the oven to 350 F.

Pour all of these into a food prep, blitz, until the cake liquor is runny, pale yellow, and glossy.

Spritz any twelve cup muffin pan with Pam, and add liners if using a cupcake pan. I used mini bunts, alas no little bunt liners are invented yet.

Spoon about two tablespoons of batter into each tin hollow.

Bake for about 20 minutes, or until a toothpick inserted comes out clean.

I made a simple glaze with about a cup icing sugar and the juice from one orange. I just spilled over the cakettes with ruthless abandon.

As always, much love, many blessings, and happy baking.

Blog Archive